Groceries are food and household supplies you buy to use at home. A short plan helps you come home with things you can actually use.
Why it matters: Buying ingredients without a plan can leave you with food that does not make a meal. A list and a running total help you avoid forgotten items, wasted food, and surprise spending.
Written guidance reviewed: September 18, 2026 · Sources and equipment assumptions are below.
Take this guide to another device
Steps, notes, supplies, setup choices, results and check dates save on this browser as you work. Plus can also keep an account copy. Account copies update only when you choose Save; loading one replaces the browser draft shown here.
Review all saved work. Saved account check dates appear in My Day. Clear the date and save again to finish a follow-up. Email settings stay separate; existing opted-in agenda or deadline emails can include these dated actions.
Make this fit your setup
Choose what applies. These notes help you prepare; every original step and safety check stays in the guide.
From meal plan to usable groceries
Plan: Meals you can actually cook: Count people and portions · Check: Look in pantry and fridge: Buy the missing quantities · Put away: Follow safe storage steps: Keep a usable meal list. Use permitted appliances. Check dates and storage instructions.
Original Life’s Checklists diagram · example only
Understand the job before starting
A meal plan becomes a shopping list only after quantities and existing supplies are checked.
A common mistake to avoid
A low package price does not establish value if you cannot use the amount.
Words used in this guide
Budget
A plan that gives your expected money specific jobs. Read the example
Rent
The amount paid to use someone else’s property for an agreed time. Read the example
Use what you already have. Check each item when it is ready.
Before you begin
Plan around food allergies, dietary needs, and the kitchen equipment you are allowed to use. Read ingredient labels each time. If you do not have a working refrigerator, choose foods that can safely stay at room temperature until opened and buy only what you can use safely.
0 of 7 steps checked0%
Guide progress and notes save on this browser; choose Save account copy above to carry them to another device with Plus. Downloads contain the complete blank checklist; print to include your current checks and notes.
Do it with me
Your step position saves on this browser. Use the picture when available, then check the written result.
STEP 1 OF 7
Look at what you already have
Start here: Look at what you already have
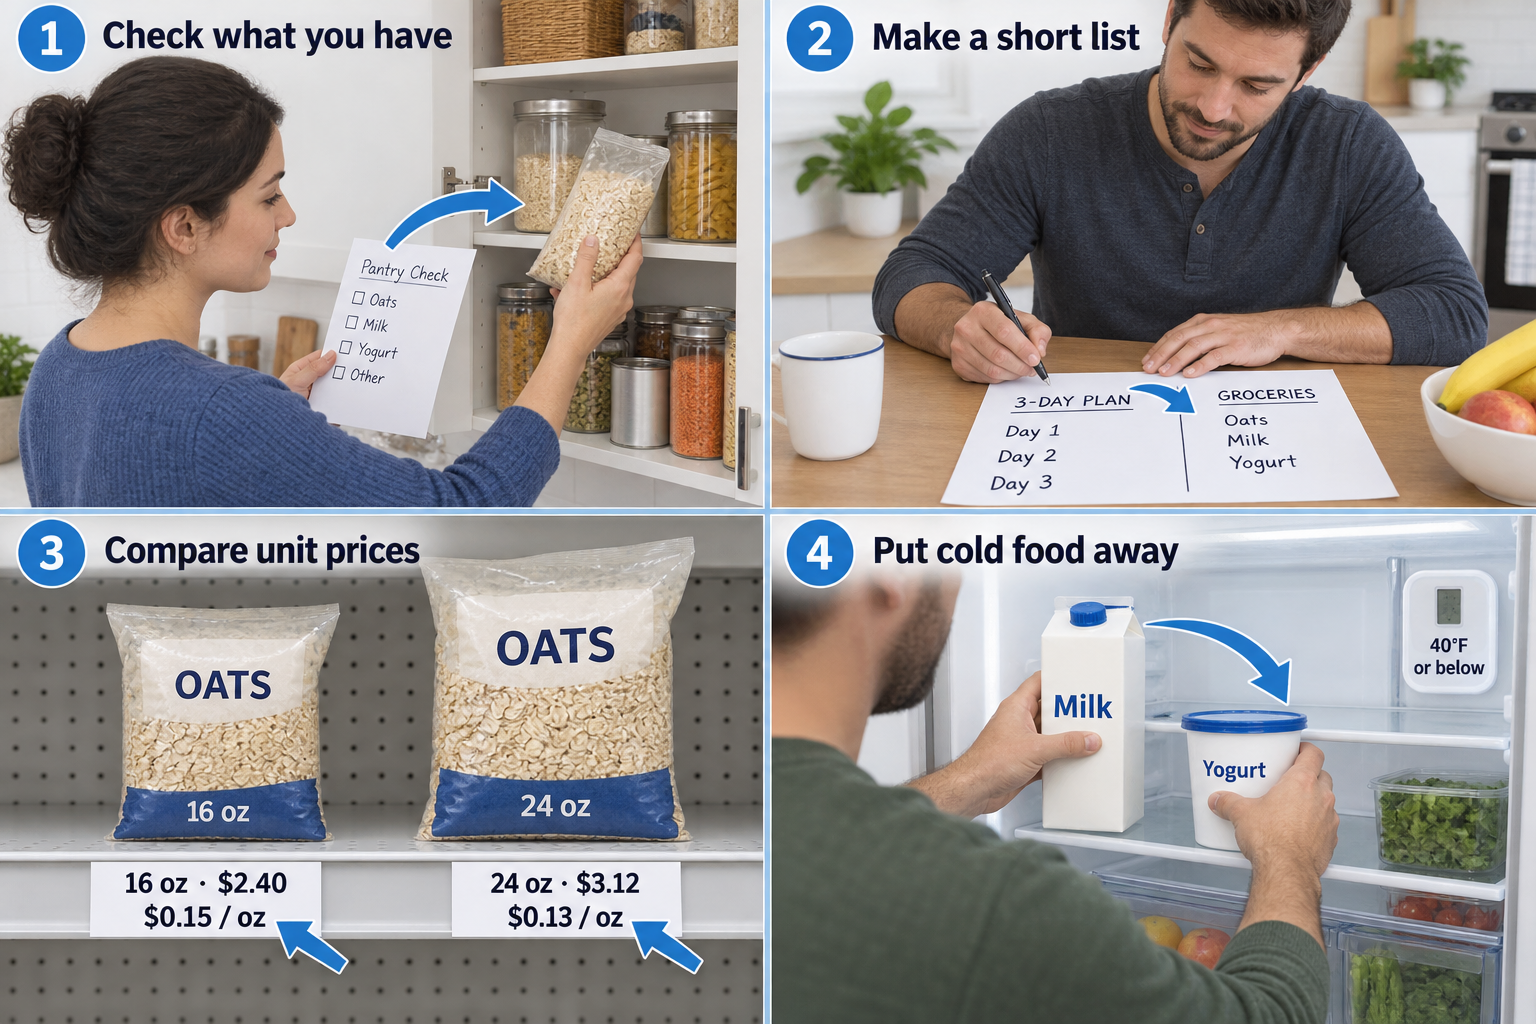
Illustration: Check what you have. Read the steps for your exact task.
Read-aloud is available in supported browsers; the written steps always remain available.
Open your cupboard, refrigerator, and freezer.
A pantry is simply the place you keep food that does not need to be cold.
Write down usable food and how much is left: for example, half a bag of rice or two apples.
Read storage directions and check when food was opened.
Do not taste food to decide whether it is safe.
Note what needs to be used soon so you do not buy it twice.
Before moving to the next step
Check this specific result: I made a short list of usable food already at home.
If that result is not true yet, leave the box unchecked. Write what is missing in your notes; use the official instructions below when the equipment or situation differs.
STEP 1 OF 7
Look at what you already have
Start here: Look at what you already have
Illustration: Check what you have. Read the steps for your exact task.
Open your cupboard, refrigerator, and freezer.
A pantry is simply the place you keep food that does not need to be cold.
Write down usable food and how much is left: for example, half a bag of rice or two apples.
Read storage directions and check when food was opened.
Do not taste food to decide whether it is safe.
Note what needs to be used soon so you do not buy it twice.
Before moving to the next step
Check this specific result: I made a short list of usable food already at home.
If that result is not true yet, leave the box unchecked. Write what is missing in your notes; use the official instructions below when the equipment or situation differs.
STEP 2 OF 7
Choose meals for just a few days
Start here: Write a few meals first.
Example: Write a few meals first. Follow the written step.
Start with two or three days, especially if you have never shopped for yourself.
Write breakfast, lunch, and dinner for each day and the number of people eating.
A portion is the amount one person plans to eat.
Choose meals you already know how to make with your allowed equipment.
For example: cereal with milk and fruit, a bean-and-vegetable wrap, or rice with vegetables and a protein you know how to prepare safely.
Use the same ingredient in more than one meal.
Include snacks or drinks you actually use; these examples are not a complete meal prescription.
Before moving to the next step
Check this specific result: I know which meals I am buying for and how many people they feed.
If that result is not true yet, leave the box unchecked. Write what is missing in your notes; use the official instructions below when the equipment or situation differs.
STEP 3 OF 7
Set a limit and turn meals into a list
Start here: Set a limit and turn meals into a list
Illustration: Make a short list. Read the steps for your exact task.
A grocery budget is the most you plan to spend on this trip.
Keep money for rent, bills, and travel separate.
Example only: if you have $50 available and keep $5 for tax, bags, or a price change, your food-list limit is $45.
Write each missing ingredient and amount, such as “one small carton of milk.” Cross off ingredients you already have.
Group your list into produce, cupboard foods, chilled foods, and frozen foods.
Estimate costs from the store’s own listing, then add them.
Include pickup or delivery fees if you use that service.
Before moving to the next step
Check this specific result: My list has amounts and estimated costs within my trip limit.
If that result is not true yet, leave the box unchecked. Write what is missing in your notes; use the official instructions below when the equipment or situation differs.
STEP 4 OF 7
Choose a store and know how to get help
Start here: Plan how to reach the store.
Example: Plan how to reach the store. Follow the written step.
Search your map app for a grocery store near home, work, or school.
Check the actual store’s hours and your way there and back.
A membership warehouse may require a paid membership; a normal supermarket usually does not.
Bring your list and accepted payment.
Inside, use a basket for a small trip or a cart for more.
Read the aisle signs.
Ask an employee, “Which aisle has rice?” or “Can you show me the price for this size?” Choose shelf-stable items first and chilled or frozen food near the end.
Keep raw meat, if buying it, separate from ready-to-eat food in your cart and bags.
Before moving to the next step
Check this specific result: I have a store, a way home, and know how to ask for an item.
If that result is not true yet, leave the box unchecked. Write what is missing in your notes; use the official instructions below when the equipment or situation differs.
STEP 5 OF 7
Compare the price for the same amount
Start here: Compare the price for the same amount
Illustration: Compare unit prices. Read the steps for your exact task.
The package price is what you pay for the whole item.
The unit price tells you the cost for a set amount, such as one ounce. “oz” means ounce.
Find the small unit-price line on the shelf label and confirm the label matches the item and size.
Example: $2.40 ÷ 16 oz = $0.15 per oz.
Another size is $3.12 ÷ 24 oz = $0.13 per oz.
The second costs less for each ounce but costs $0.72 more today.
Compare the same units and similar products.
A larger pack saves money only if you can afford it, store it, and use it.
Check whether a sale needs a store card, coupon, or several items.
Add each package price to your running total.
Before moving to the next step
Check this specific result: I compared matching units and checked the whole cost against my limit.
If that result is not true yet, leave the box unchecked. Write what is missing in your notes; use the official instructions below when the equipment or situation differs.
STEP 6 OF 7
Check out and keep the receipt
Start here: Pay and keep the receipt.
Example: Pay and keep the receipt. Follow the written step.
Checkout is where the store adds up your items and you pay.
For your first trip, a staffed lane can be easier: place items on the belt, wait your turn, and follow the cashier’s directions.
Watch the total.
If you are over your limit, say, “Please remove this item before I pay.” Ask about an unexpected price before finishing.
With self-checkout, scan each barcode once and call the attendant for help rather than guessing.
Follow the card reader or cashier’s payment directions and cover your PIN if one is required.
Take your bags, card, change if due, and receipt.
Check that the receipt matches what you bought.
Before moving to the next step
Check this specific result: I paid for the correct items and kept my receipt.
If that result is not true yet, leave the box unchecked. Write what is missing in your notes; use the official instructions below when the equipment or situation differs.
STEP 7 OF 7
Go home and put cold food away first
Start here: Go home and put cold food away first
Illustration: Put cold food away. Read the steps for your exact task.
Go straight home with food that needs to stay cold.
Refrigerate or freeze it promptly; do not leave it out for more than two hours in total, or one hour when the air is above 90°F.
An insulated bag helps during travel but does not make an unknown temperature safe.
Use an appliance thermometer: refrigerator 40°F or below; freezer 0°F.
Follow each package’s storage directions, including after opening.
Keep raw meat contained so it cannot drip on ready-to-eat food.
Put cupboard food in a clean, dry place away from cleaners.
Write the actual trip cost on your plan and choose the first meal to use up what you bought.
Before moving to the next step
Check this specific result: Cold food is stored safely and I know what I will use first.
If that result is not true yet, leave the box unchecked. Write what is missing in your notes; use the official instructions below when the equipment or situation differs.
Word on your trip
Plain English
Example
Ingredient
One food used to make a meal.
Rice in a rice bowl.
Quantity
How much or how many.
Two apples; one 16-ounce bag.
Package price
Cost of the whole item before any applicable tax.
$2.40 for a 16-ounce bag.
Unit price
Cost for one matching unit.
$2.40 ÷ 16 = $0.15 per ounce.
Perishable
Food that spoils and often needs to stay cold.
Milk; follow its storage label.
Shelf-stable
Can stay at room temperature while unopened, as labeled.
An intact unopened can of beans.
Pictures for this guide
Picture 1 of 7 · Check what you have
A young adult checks a pantry package against a short paper list.
For: Look at what you already have
Illustrations show examples of the actions above. Follow your equipment’s instructions.
Notes about these pictures
Open your cupboard, refrigerator, and freezer. A pantry is simply the place you keep food that does not need to be cold. Write down usable food and how much is left: for example, half a bag of rice or two apples. Read storage directions and check when food was opened. Do not taste food to decide whether it is safe. Note what needs to be used soon so you do not buy it twice.
Plan around food allergies, dietary needs, and the kitchen equipment you are allowed to use. Read ingredient labels each time. If you do not have a working refrigerator, choose foods that can safely stay at room temperature until opened and buy only what you can use safely.
Was this step clear?
Flag “Look at what you already have” for review. We save the guide and step identifiers with your account to limit duplicates, not your private notes.
Link details checked 2026-10-03. Video availability and equipment menus can change.
These YouTube videos belong to their respective creators. Life’s Checklists does not own them and is not affiliated with the creators. Links open on YouTube, where the videos are available independently of our membership.
How to use the video with this guide
Read “Before you begin” first. Watch the relevant part, pause, then return to the written step and its completion check. Use captions and playback speed if they help. A demonstration may cover only part of the task or show different equipment.
Your model’s instructions and current official guidance take priority. For urgent problems, follow the stop instructions without waiting to watch a video.
For this guide, the final result is: Cold food is stored safely and I know what I will use first.
A concrete way to approach this task
Pick two meals, check your pantry, and write the missing ingredient quantities before visiting the shop.
What if I cannot complete a step?
If the shopping total exceeds your budget, revise the meal choices or quantities before checkout. Do not silently replace different ingredients in an exact-match plan.
Identify the exact step: “Look at what you already have.” Record what you tried, what happened, and which item or model you used. Ask for help with that specific problem rather than repeating an unsafe or unsuccessful action.
Plan around food allergies, dietary needs, and the kitchen equipment you are allowed to use. Read ingredient labels each time. If you do not have a working refrigerator, choose foods that can safely stay at room temperature until opened and buy only what you can use safely.
Connect this skill to everyday life
Write down the total move-in cash and monthly costs before applying. Ask which charges are required and which are optional.
Advertised rent is not necessarily the whole monthly cost. A refundable deposit still needs cash now. An application does not mean you have a signed lease.