Practice on a book or empty box before measuring for storage or a move. Learn where to start, how to read the line, and why the unit matters.
Why it matters: A size without a unit can be misunderstood. A checked measurement helps you ask better questions before buying a container or planning a space.
Written guidance reviewed: 2026-10-28 · Sources and equipment assumptions are below.
Take this guide to another device
Steps, notes, supplies, setup choices, results and check dates save on this browser as you work. Plus can also keep an account copy. Account copies update only when you choose Save; loading one replaces the browser draft shown here.
Review all saved work. Saved account check dates appear in My Day. Clear the date and save again to finish a follow-up. Email settings stay separate; existing opted-in agenda or deadline emails can include these dated actions.
Understand the job before starting
A size without a unit can be misunderstood. A checked measurement helps you ask better questions before buying a container or planning a space.
A common mistake to avoid
If you cannot see the marks, use a tool with larger print or ask someone to read it with you. A damaged or bent hook can affect accuracy. Do not use a tape with a damaged blade. Do not use an image on a screen as a calibrated ruler: zoom and screen size change the picture. This is an introductory size check, not a construction or installation measurement.
Words used in this guide
Rent
The amount paid to use someone else’s property for an agreed time. Read the example
Use what you already have. Check each item when it is ready.
Before you begin
Stay at table height for this practice. Do not climb, reach near wiring, move heavy furniture, or use this guide for cutting, mounting or structural work. A metal tape can have sharp edges and can snap back. Use its lock as its maker directs and guide it back slowly; keep fingers away from sharp edges and the case opening. A rigid ruler is a simpler choice for a small object.
0 of 4 steps checked0%
Guide progress and notes save on this browser; choose Save account copy above to carry them to another device with Plus. Downloads contain the complete blank checklist; print to include your current checks and notes.
Do it with me
Your step position saves on this browser. Use the picture when available, then check the written result.
STEP 1 OF 4
Choose a unit and a safe practice object
Start here: Put a book on a table and find the ruler zero mark.
Illustration: Choose a unit and a safe practice object. Read the steps for your exact task.
Read-aloud is available in supported browsers; the written steps always remain available.
A measurement is a number that describes size.
Its unit tells you what the number counts.
Inches and centimeters are different units; do not switch rows partway through.
Find the printed zero mark on your ruler.
Some rulers have a blank margin before zero, so the plastic edge is not always the start.
Pick one straight edge of the book to measure.
Write down which edge you chose so you can repeat it.
Before moving to the next step
Check this specific result: I chose one object edge, found zero, and know which unit I am using.
If that result is not true yet, leave the box unchecked. Write what is missing in your notes; use the official instructions below when the equipment or situation differs.
STEP 1 OF 4
Choose a unit and a safe practice object
Start here: Put a book on a table and find the ruler zero mark.
Illustration: Choose a unit and a safe practice object. Read the steps for your exact task.
A measurement is a number that describes size.
Its unit tells you what the number counts.
Inches and centimeters are different units; do not switch rows partway through.
Find the printed zero mark on your ruler.
Some rulers have a blank margin before zero, so the plastic edge is not always the start.
Pick one straight edge of the book to measure.
Write down which edge you chose so you can repeat it.
Before moving to the next step
Check this specific result: I chose one object edge, found zero, and know which unit I am using.
If that result is not true yet, leave the box unchecked. Write what is missing in your notes; use the official instructions below when the equipment or situation differs.
STEP 2 OF 4
Line up the start and keep the ruler straight
Start here: Place zero at one end and read at the other end.
Illustration: Line up the start and keep the ruler straight. Read the steps for your exact task.
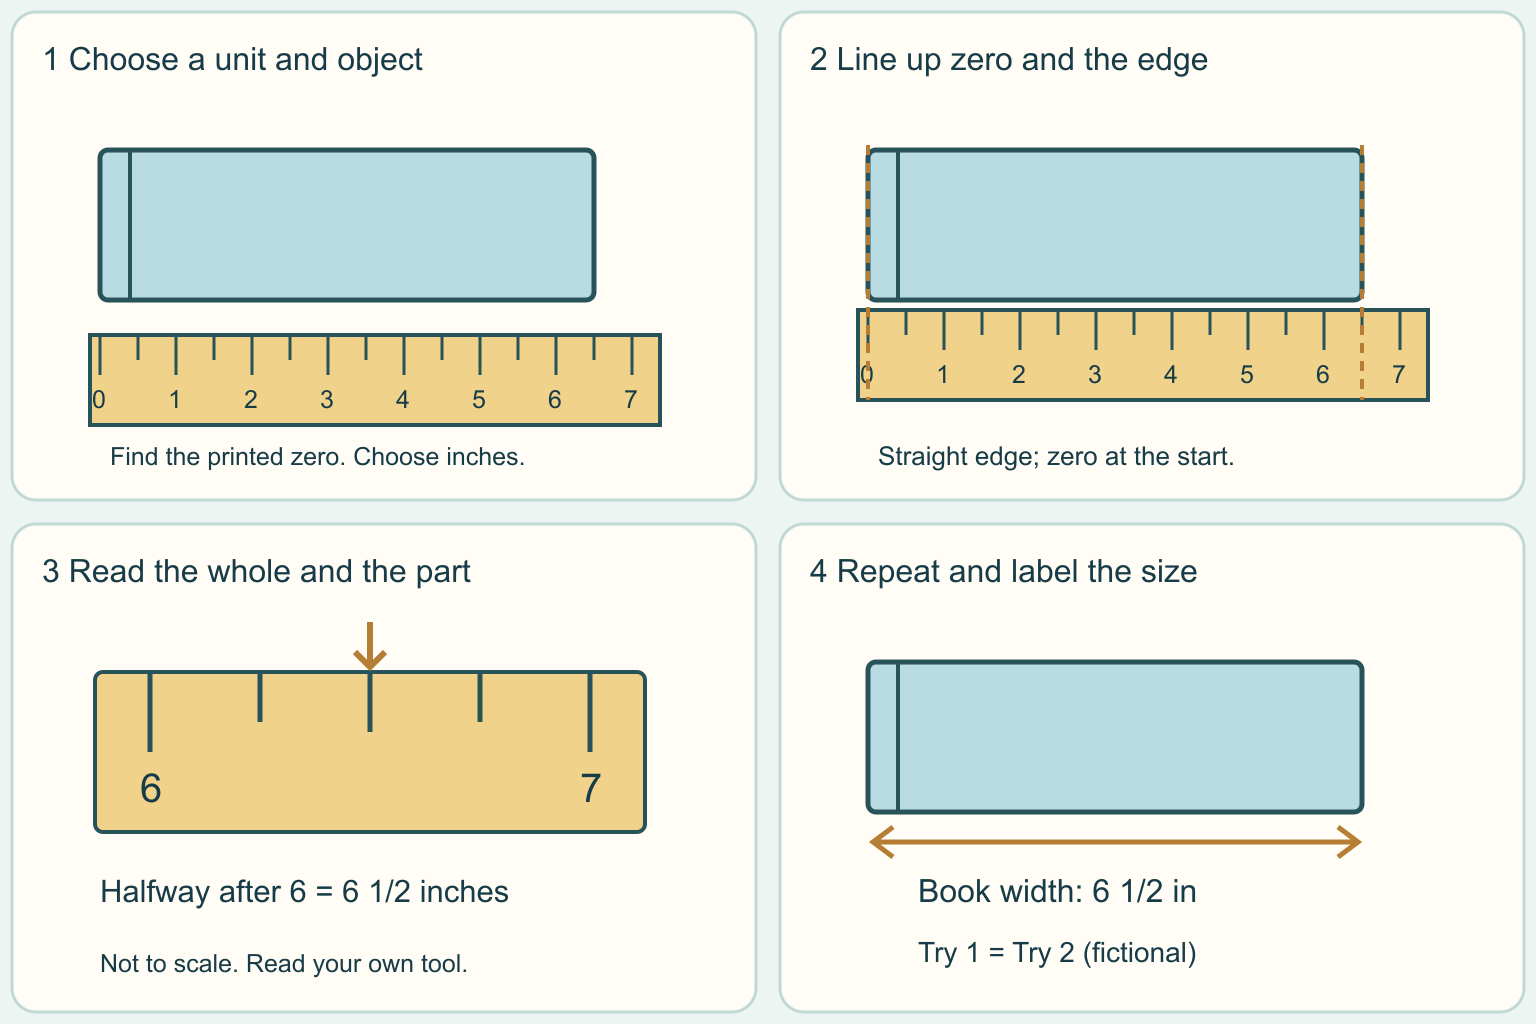
Lay the ruler beside the chosen edge with zero exactly at its start.
Keep the scale straight along that edge, not diagonal across the book.
Look down at the end rather than from far to one side.
With a tape, follow the maker hook and lock instructions and support the blade.
Do not stretch it across a walkway.
If it will not stay steady, ask someone to help or use a ruler and a smaller object.
Before moving to the next step
Check this specific result: Zero is at the start, and the ruler or tape runs straight to the same edge end.
If that result is not true yet, leave the box unchecked. Write what is missing in your notes; use the official instructions below when the equipment or situation differs.
STEP 3 OF 4
Read the number and the small mark
Start here: Read the last whole number passed, then the part after it.
Illustration: Read the number and the small mark. Read the steps for your exact task.
On an inch scale, large numbered lines mark whole inches.
Halfway between two whole-inch marks is one-half inch.
In our drawing the end is halfway after 6, so the reading is 6 1/2 inches: six and one-half.
It is not 6.1 inches.
On a typical metric scale, 10 small millimeter spaces make 1 centimeter.
An end at 12 centimeters plus 3 millimeters is 12.3 centimeters.
Count spaces from the whole-number mark, and use the markings actually on your tool.
Ask for help if a tiny line is unclear instead of inventing precision.
Before moving to the next step
Check this specific result: I read the whole number and the remaining part, and wrote the unit beside it.
If that result is not true yet, leave the box unchecked. Write what is missing in your notes; use the official instructions below when the equipment or situation differs.
STEP 4 OF 4
Measure again and label each direction
Start here: Repeat from zero, then record a clearly named dimension.
Illustration: Measure again and label each direction. Read the steps for your exact task.
Lift the ruler away, line it up again and repeat the same edge.
If the answers differ, check zero, straightness and the small marks.
A dimension means one direction of size.
Label width, depth or height with a quick sketch showing what you mean; sellers can list directions in different orders.
For a storage box, compare its inside usable size with the object, not just its outside size.
Handles and tapered sides can reduce space.
A close match on paper is not proof of a fit.
For a doorway or heavy furniture move, ask for a separate access check.
Before moving to the next step
Check this specific result: My repeat reading agrees, and my note names the object, direction, number and unit.
If that result is not true yet, leave the box unchecked. Write what is missing in your notes; use the official instructions below when the equipment or situation differs.
Pictures for this guide
Picture 1 of 4 · Choose a unit and a safe practice object
A book rests on a table beside a ruler with zero identified.
For: Choose a unit and a safe practice object
Illustrations show examples of the actions above. Follow your equipment’s instructions.
Notes about these pictures
A measurement is a number that describes size. Its unit tells you what the number counts. Inches and centimeters are different units; do not switch rows partway through. Find the printed zero mark on your ruler. Some rulers have a blank margin before zero, so the plastic edge is not always the start. Pick one straight edge of the book to measure. Write down which edge you chose so you can repeat it.
Stay at table height for this practice. Do not climb, reach near wiring, move heavy furniture, or use this guide for cutting, mounting or structural work. A metal tape can have sharp edges and can snap back. Use its lock as its maker directs and guide it back slowly; keep fingers away from sharp edges and the case opening. A rigid ruler is a simpler choice for a small object.
Was this step clear?
Flag “Choose a unit and a safe practice object” for review. We save the guide and step identifiers with your account to limit duplicates, not your private notes.
A specific companion has not been selected for this new guide yet. You can search for related demonstrations; search results have not been reviewed by Life’s Checklists.
These YouTube videos belong to their respective creators. Life’s Checklists does not own them and is not affiliated with the creators. Links open on YouTube, where the videos are available independently of our membership.
How to use the video with this guide
Read “Before you begin” first. Watch the relevant part, pause, then return to the written step and its completion check. Use captions and playback speed if they help. A demonstration may cover only part of the task or show different equipment.
Your model’s instructions and current official guidance take priority. For urgent problems, follow the stop instructions without waiting to watch a video.
Finish the job and know what to do next.
For this guide, the final result is: My repeat reading agrees, and my note names the object, direction, number and unit.
A concrete way to approach this task
Fictional practice: the illustrated book edge is 6 1/2 inches on both tries. Write Book width: 6 1/2 in, not just 6.5. Here in means inches. This is invented practice data, not a size to use for your own book or a recommended storage box.
What if I cannot complete a step?
If you cannot see the marks, use a tool with larger print or ask someone to read it with you. A damaged or bent hook can affect accuracy. Do not use a tape with a damaged blade. Do not use an image on a screen as a calibrated ruler: zoom and screen size change the picture. This is an introductory size check, not a construction or installation measurement.
Identify the exact step: “Choose a unit and a safe practice object.” Record what you tried, what happened, and which item or model you used. Ask for help with that specific problem rather than repeating an unsafe or unsuccessful action.
Stay at table height for this practice. Do not climb, reach near wiring, move heavy furniture, or use this guide for cutting, mounting or structural work. A metal tape can have sharp edges and can snap back. Use its lock as its maker directs and guide it back slowly; keep fingers away from sharp edges and the case opening. A rigid ruler is a simpler choice for a small object.
Connect this skill to everyday life
Write down the total move-in cash and monthly costs before applying. Ask which charges are required and which are optional.
Advertised rent is not necessarily the whole monthly cost. A refundable deposit still needs cash now. An application does not mean you have a signed lease.
A useful record for this task: Record the result of “Measure again and label each direction”: My repeat reading agrees, and my note names the object, direction, number and unit.
When finished, record the result and any next check or follow-up date. Your original step checks and notes remain on this browser.
Keep the result of your work
Finish and check every step before recording completion. You can write a draft below now.
Result: Not recorded · Next check: Not chosen
Choose a date from your own manual or situation. No email is enabled by saving this record.