Learn what to take apart, how to reach the inside, and when a bottle is ready to put away. Start with ordinary dish soap and the instructions for your own bottle.
Why it matters: Water can look clear while the mouthpiece and lid still need washing. A small cleaning routine helps you avoid carrying yesterday's residue into today's drink.
Written guidance reviewed: 2026-10-18 · Sources and equipment assumptions are below.
Take this guide to another device
Steps, notes, supplies, setup choices, results and check dates save on this browser as you work. Plus can also keep an account copy. Account copies update only when you choose Save; loading one replaces the browser draft shown here.
Review all saved work. Saved account check dates appear in My Day. Clear the date and save again to finish a follow-up. Email settings stay separate; existing opted-in agenda or deadline emails can include these dated actions.
Understand the job before starting
Water can look clear while the mouthpiece and lid still need washing. A small cleaning routine helps you avoid carrying yesterday's residue into today's drink.
A common mistake to avoid
A cleaning hack is not a universal recipe. Hydro Flask and Nalgene publish different product-care and deep-cleaning advice; do not copy one brand's bleach, heat, or dishwasher directions onto another bottle. This beginner routine uses soap and brushing, not a chemical mixture. Cleaning removes dirt and many germs; it is not a promise of disinfection. For persistent residue, use exact model instructions or replace the affected part.
Words used in this guide
Rent
The amount paid to use someone else’s property for an agreed time. Read the example
The order of the job
Find the care instructions and separate approved parts
Use what you already have. Check each item when it is ready.
Before you begin
Use this routine for an ordinary reusable drinking-water bottle. Electronic lids, filters, infant feeding bottles, and medical equipment need their own instructions. Do not use cracked glass or damaged parts. Stop using a bottle with remaining slime, mold, or a persistent smell after cleaning; ask its maker about cleaning or replacement. Do not mix cleaning chemicals.
0 of 4 steps checked0%
Guide progress and notes save on this browser; choose Save account copy above to carry them to another device with Plus. Downloads contain the complete blank checklist; print to include your current checks and notes.
Do it with me
Your step position saves on this browser. Use the picture when available, then check the written result.
STEP 1 OF 4
Find the care instructions and separate approved parts
Start here: Find the care instructions and separate approved parts
Illustration: Find the care instructions and separate approved parts. Read the steps for your exact task.
Read-aloud is available in supported browsers; the written steps always remain available.
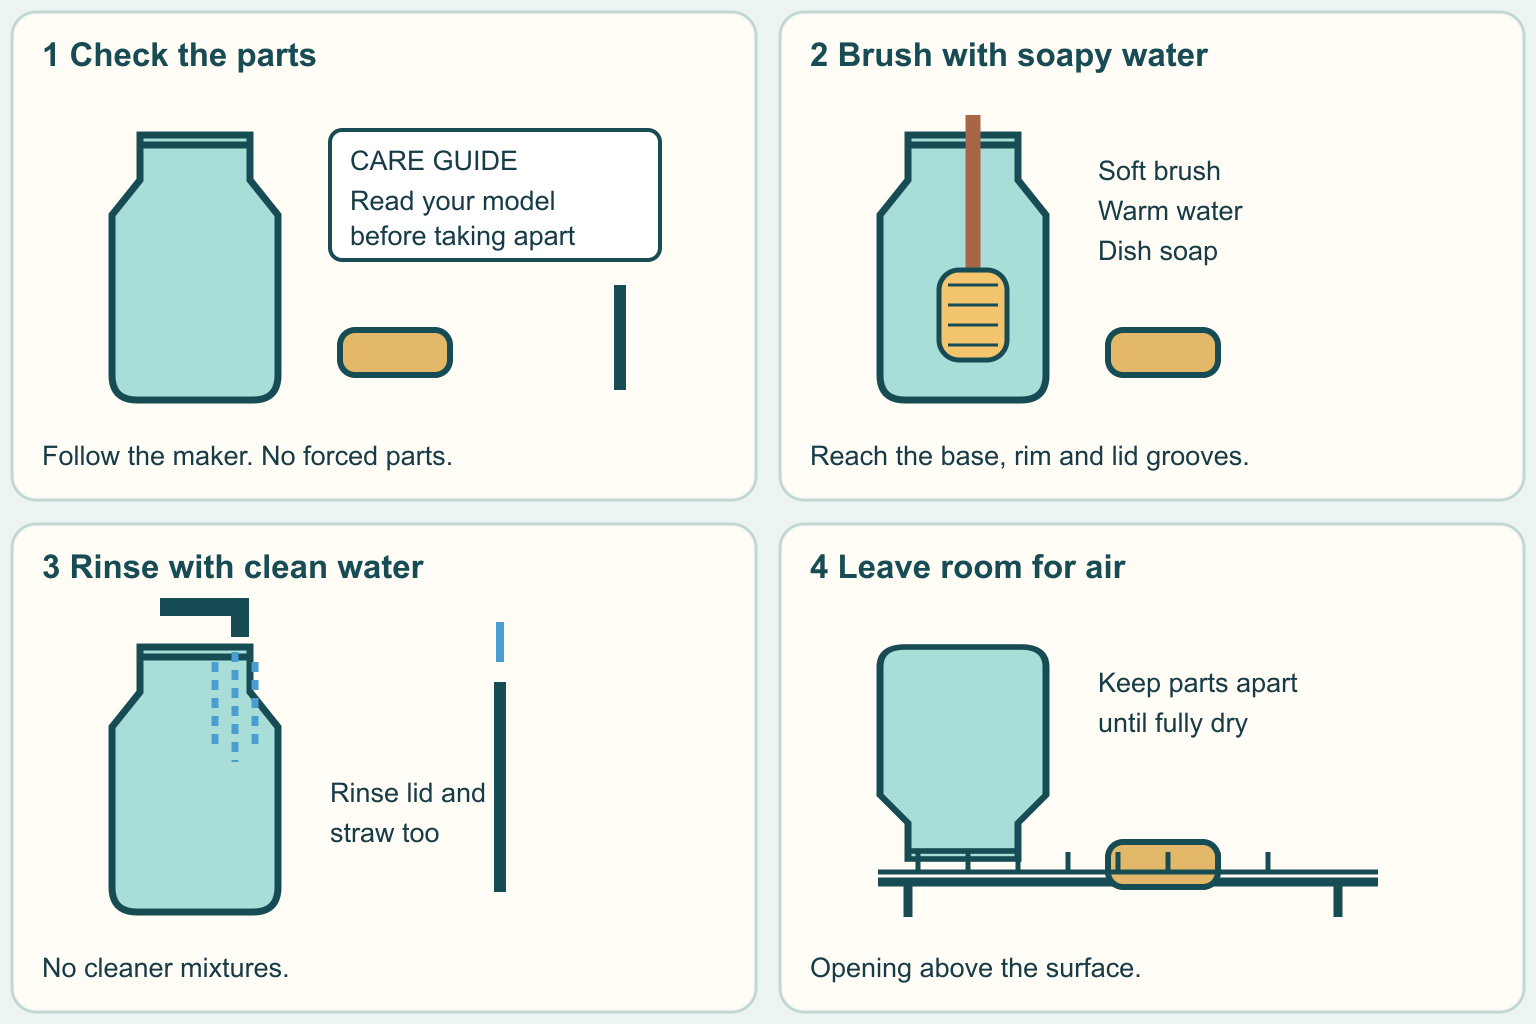
Empty the bottle.
Find its brand and model on the bottom, package, or purchase record.
On the maker's website, search that model plus 'care instructions.' Dishwasher safe means the maker allows a dishwasher for that part; the lid and body may have different rules.
Take off the lid and remove a straw only as shown in the instructions.
A gasket is a soft sealing ring that helps prevent leaks.
Do not pry out a gasket or valve unless the maker shows how.
Set small parts in a clean bowl so they do not fall down the drain.
Before moving to the next step
Check this specific result: I know which parts come apart and which cleaning method each part allows.
If that result is not true yet, leave the box unchecked. Write what is missing in your notes; use the official instructions below when the equipment or situation differs.
STEP 1 OF 4
Find the care instructions and separate approved parts
Start here: Find the care instructions and separate approved parts
Illustration: Find the care instructions and separate approved parts. Read the steps for your exact task.
Empty the bottle.
Find its brand and model on the bottom, package, or purchase record.
On the maker's website, search that model plus 'care instructions.' Dishwasher safe means the maker allows a dishwasher for that part; the lid and body may have different rules.
Take off the lid and remove a straw only as shown in the instructions.
A gasket is a soft sealing ring that helps prevent leaks.
Do not pry out a gasket or valve unless the maker shows how.
Set small parts in a clean bowl so they do not fall down the drain.
Before moving to the next step
Check this specific result: I know which parts come apart and which cleaning method each part allows.
If that result is not true yet, leave the box unchecked. Write what is missing in your notes; use the official instructions below when the equipment or situation differs.
STEP 2 OF 4
Wash the inside, lid, and drinking opening
Start here: Wash the inside, lid, and drinking opening
Illustration: Wash the inside, lid, and drinking opening. Read the steps for your exact task.
Wash your hands and start with a clean sink and brushes.
Use warm water you can handle comfortably, hand dish soap, and a soft brush that reaches the bottom without forcing it.
Brush the inside walls and base, then the rim where your lips touch.
Wash the lid's grooves and drinking opening too.
For a removable straw, use a fitting straw brush and wash through its full length.
Follow the maker's directions for seals and valves.
Do not force a brush into a space it cannot reach; ask the maker how to clean that part.
Before moving to the next step
Check this specific result: I washed the inside, rim, lid, and any removable straw, rather than just shaking water inside.
If that result is not true yet, leave the box unchecked. Write what is missing in your notes; use the official instructions below when the equipment or situation differs.
STEP 3 OF 4
Rinse every washed surface
Start here: Rinse every washed surface
Illustration: Rinse every washed surface. Read the steps for your exact task.
Pour out the soapy water.
Rinse the bottle and each separate part with clean running water until soap is gone.
Run water through a removable straw as well.
Look at the rim and lid grooves in good light.
Rinsing means removing the loosened dirt and soap with clean water; it does not replace brushing.
Do not add bleach, vinegar, or another cleaner to the soap.
If a mark or smell remains, pause and use the maker's specific advice instead of a stronger homemade mixture.
Before moving to the next step
Check this specific result: All washed parts are rinsed, with no visible soap or residue left.
If that result is not true yet, leave the box unchecked. Write what is missing in your notes; use the official instructions below when the equipment or situation differs.
STEP 4 OF 4
Air-dry, reassemble, and plan the next wash
Start here: Air-dry, reassemble, and plan the next wash
Illustration: Air-dry, reassemble, and plan the next wash. Read the steps for your exact task.
Put parts separately on a clean rack so water can drain and air can reach inside.
Keep the bottle opening above the surface rather than sealed against a counter.
Air-dry means let the air dry it without closing it while wet.
Once dry, fit approved removable parts back exactly as the maker shows.
Check that the lid fits normally.
Use a daily reminder to wash the bottle after use and follow any extra care instructions.
Clean and dry the brushes too.
If you cannot reach a dirty area, keep using another clean cup while you arrange help or a replacement part.
Before moving to the next step
Check this specific result: The parts dried with room for air, and I have a plan to wash after use.
If that result is not true yet, leave the box unchecked. Write what is missing in your notes; use the official instructions below when the equipment or situation differs.
Pictures for this guide
Picture 1 of 4 · Find the care instructions and separate approved parts
Bottle body, lid and straw next to a care sheet.
For: Find the care instructions and separate approved parts
Illustrations show examples of the actions above. Follow your equipment’s instructions.
Notes about these pictures
Empty the bottle. Find its brand and model on the bottom, package, or purchase record. On the maker's website, search that model plus 'care instructions.' Dishwasher safe means the maker allows a dishwasher for that part; the lid and body may have different rules. Take off the lid and remove a straw only as shown in the instructions. A gasket is a soft sealing ring that helps prevent leaks. Do not pry out a gasket or valve unless the maker shows how. Set small parts in a clean bowl so they do not fall down the drain.
Use this routine for an ordinary reusable drinking-water bottle. Electronic lids, filters, infant feeding bottles, and medical equipment need their own instructions. Do not use cracked glass or damaged parts. Stop using a bottle with remaining slime, mold, or a persistent smell after cleaning; ask its maker about cleaning or replacement. Do not mix cleaning chemicals.
Was this step clear?
Flag “Find the care instructions and separate approved parts” for review. We save the guide and step identifiers with your account to limit duplicates, not your private notes.
A specific companion has not been selected for this new guide yet. You can search for related demonstrations; search results have not been reviewed by Life’s Checklists.
These YouTube videos belong to their respective creators. Life’s Checklists does not own them and is not affiliated with the creators. Links open on YouTube, where the videos are available independently of our membership.
How to use the video with this guide
Read “Before you begin” first. Watch the relevant part, pause, then return to the written step and its completion check. Use captions and playback speed if they help. A demonstration may cover only part of the task or show different equipment.
Your model’s instructions and current official guidance take priority. For urgent problems, follow the stop instructions without waiting to watch a video.
Finish the job and know what to do next.
For this guide, the final result is: The parts dried with room for air, and I have a plan to wash after use.
A concrete way to approach this task
You bring a straw bottle home from class. Empty it, read the lid instructions, wash the allowed separate parts, rinse, and leave them apart on a rack. Refilling it without washing skips the lid and straw.
What if I cannot complete a step?
A cleaning hack is not a universal recipe. Hydro Flask and Nalgene publish different product-care and deep-cleaning advice; do not copy one brand's bleach, heat, or dishwasher directions onto another bottle. This beginner routine uses soap and brushing, not a chemical mixture. Cleaning removes dirt and many germs; it is not a promise of disinfection. For persistent residue, use exact model instructions or replace the affected part.
Identify the exact step: “Find the care instructions and separate approved parts.” Record what you tried, what happened, and which item or model you used. Ask for help with that specific problem rather than repeating an unsafe or unsuccessful action.
Use this routine for an ordinary reusable drinking-water bottle. Electronic lids, filters, infant feeding bottles, and medical equipment need their own instructions. Do not use cracked glass or damaged parts. Stop using a bottle with remaining slime, mold, or a persistent smell after cleaning; ask its maker about cleaning or replacement. Do not mix cleaning chemicals.
Connect this skill to everyday life
Use your school’s official calendar to collect one deadline and its required action. Separate application, registration, payment, housing, and financial-aid dates.
Admission is not course registration, and an aid estimate is not money already received. Each office may need different documents.
A useful record for this task: Record the result of “Air-dry, reassemble, and plan the next wash”: The parts dried with room for air, and I have a plan to wash after use.
When finished, record the result and any next check or follow-up date. Your original step checks and notes remain on this browser.
Keep the result of your work
Finish and check every step before recording completion. You can write a draft below now.
Result: Not recorded · Next check: Not chosen
Choose a date from your own manual or situation. No email is enabled by saving this record.