Plan and complete a manual-approved engine oil change
Engine oil lubricates moving parts. The oil filter traps particles. Changing both uses the exact oil and filter specified for that engine.
Why it matters: Too little oil, the wrong oil, a loose drain plug, or an unsupported car can cause serious harm. Fully electric vehicles do not have engine-oil changes.
Written guidance reviewed: September 17, 2026 · Sources and equipment assumptions are below.
Take this guide to another device
Steps, notes, supplies, setup choices, results and check dates save on this browser as you work. Plus can also keep an account copy. Account copies update only when you choose Save; loading one replaces the browser draft shown here.
Review all saved work. Saved account check dates appear in My Day. Clear the date and save again to finish a follow-up. Email settings stay separate; existing opted-in agenda or deadline emails can include these dated actions.
Understand the job before starting
Specification, safe access, tools and disposal are parts of one complete plan.
A common mistake to avoid
Starting before all parts and safe support are ready can leave the vehicle unusable.
Words used in this guide
Oil change
A service that replaces used engine oil, usually with a new oil filter too. Read the example
Use what you already have. Check each item when it is ready.
Before you begin
A young or first-time learner should practice with a capable adult or qualified instructor in a safe place. Your vehicle and tool manuals decide the exact procedure. Calling roadside assistance is a successful safe choice. This is a supervised workshop task for a beginner. Never crawl under a vehicle supported only by a jack. If you cannot verify support points, drain-plug identity, capacity, seals, and torque, use a qualified shop.
0 of 9 steps checked0%
Guide progress and notes save on this browser; choose Save account copy above to carry them to another device with Plus. Downloads contain the complete blank checklist; print to include your current checks and notes.
Do it with me
Your step position saves on this browser. Use the picture when available, then check the written result.
STEP 1 OF 9
Confirm what vehicle you have
Start here: Confirm the task applies to this vehicle.
Example: Confirm the task applies to this vehicle. Follow the written step.
Read-aloud is available in supported browsers; the written steps always remain available.
A gasoline/diesel engine uses engine oil.
A hybrid may too; it must be fully off and prevented from restarting as its manual requires.
A full EV has no combustion-engine oil change, but still has other manufacturer maintenance.
Find your engine and model year, not just the vehicle name.
Before moving to the next step
Check this specific result: I confirmed an engine-oil change applies to this vehicle.
If that result is not true yet, leave the box unchecked. Write what is missing in your notes; use the official instructions below when the equipment or situation differs.
STEP 1 OF 9
Confirm what vehicle you have
Start here: Confirm the task applies to this vehicle.
Example: Confirm the task applies to this vehicle. Follow the written step.
A gasoline/diesel engine uses engine oil.
A hybrid may too; it must be fully off and prevented from restarting as its manual requires.
A full EV has no combustion-engine oil change, but still has other manufacturer maintenance.
Find your engine and model year, not just the vehicle name.
Before moving to the next step
Check this specific result: I confirmed an engine-oil change applies to this vehicle.
If that result is not true yet, leave the box unchecked. Write what is missing in your notes; use the official instructions below when the equipment or situation differs.
STEP 2 OF 9
Write down every specification
Start here: Write down every specification
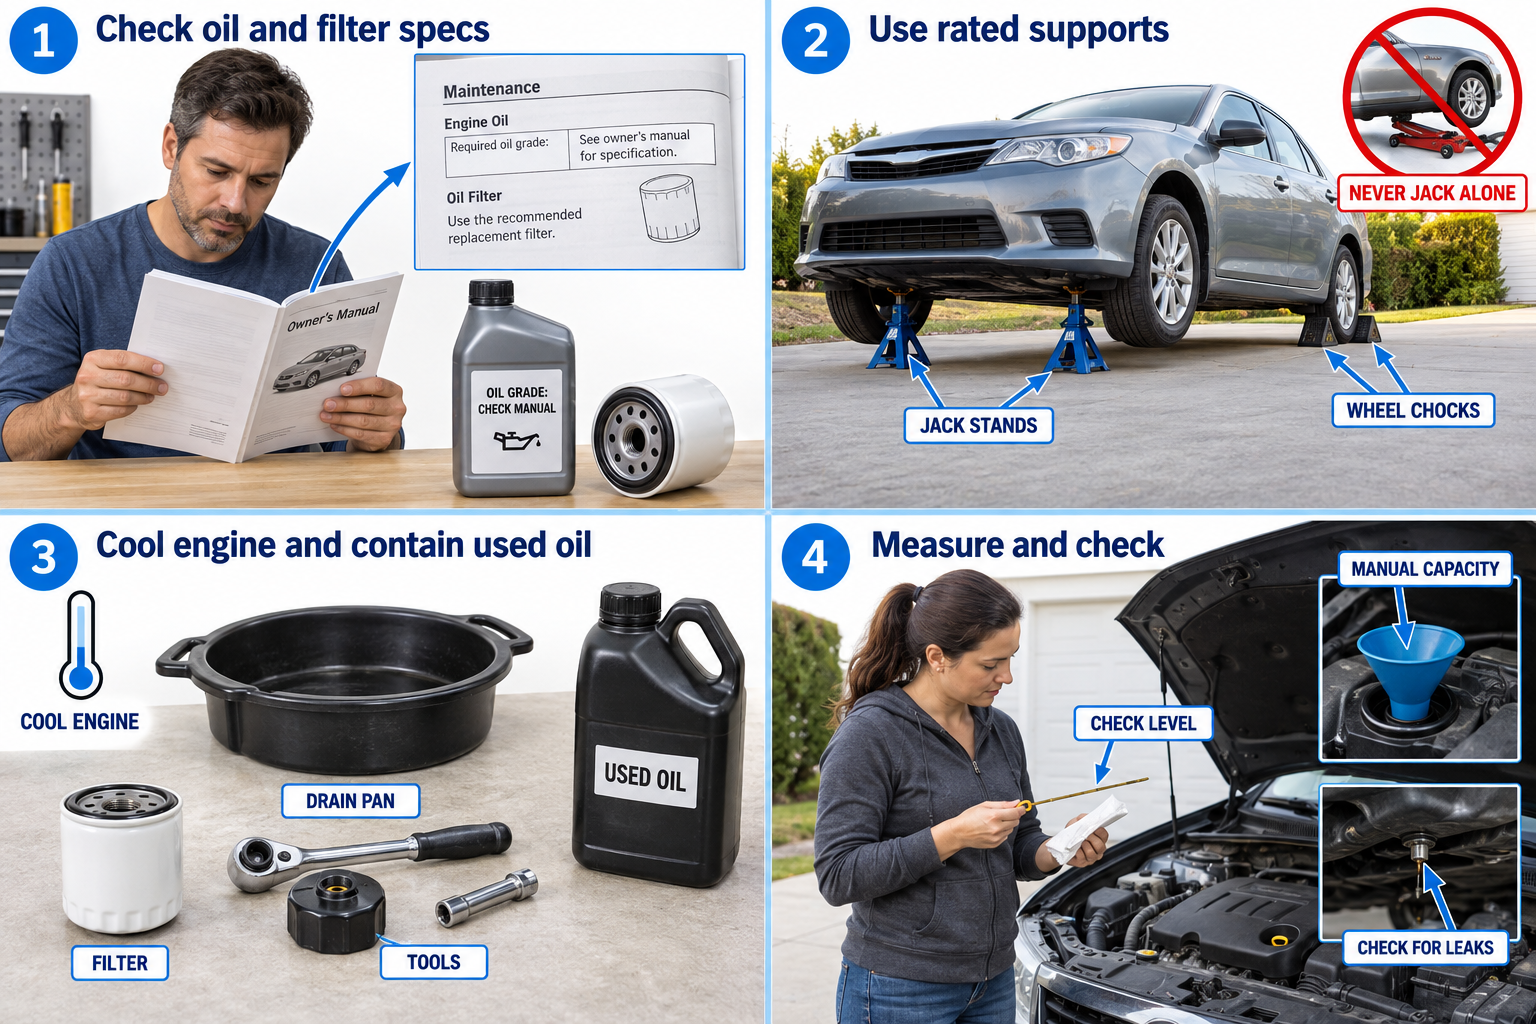
Illustration: Check oil and filter specs. Read the steps for your exact task.
Record oil viscosity and required approval, filter part number, capacity with filter, drain-plug/seal requirements, and torque values.
Capacity is a starting specification; the manual’s level-check procedure verifies final fill.
Do not use a guessed “five quarts for every car.”
Before moving to the next step
Check this specific result: I have the exact parts, capacity, seals, and torque.
If that result is not true yet, leave the box unchecked. Write what is missing in your notes; use the official instructions below when the equipment or situation differs.
STEP 3 OF 9
Set up safe access with a trained person
Start here: Set up safe access with a trained person
Illustration: Use rated supports. Read the steps for your exact task.
Use firm, level ground and the manual’s parking/chocking and lift procedures.
A rated jack lifts; correctly rated stands at approved support points hold.
Ramps require their own approved placement and chocking.
Have the setup checked before anyone goes underneath; keep the engine off.
Before moving to the next step
Check this specific result: A capable person checked the approved supports and chocks.
If that result is not true yet, leave the box unchecked. Write what is missing in your notes; use the official instructions below when the equipment or situation differs.
STEP 4 OF 9
Let unsafe heat cool and identify the plug
Start here: Let unsafe heat cool and identify the plug
Illustration: Cool engine and contain used oil. Read the steps for your exact task.
Follow the service instructions for temperature; oil and exhaust can burn.
Identify the engine-oil drain plug and filter positively.
A transmission drain plug is not the same part.
Place a pan large enough for the full capacity and expected flow path.
Before moving to the next step
Check this specific result: The oil is safe to handle and the correct drain/filter are identified.
If that result is not true yet, leave the box unchecked. Write what is missing in your notes; use the official instructions below when the equipment or situation differs.
STEP 5 OF 9
Drain into the pan
Start here: Drain only by the approved procedure.
Example: Drain only by the approved procedure. Follow the written step.
Using the correct tool, carefully loosen and remove the identified drain plug per the service procedure, keeping clear of the flow.
Allow draining.
Inspect and replace the required washer/seal.
Reinstall the plug by hand first, then torque to the specification; do not use an impact driver.
Before moving to the next step
Check this specific result: The used oil is captured and the drain plug/seal are correctly installed.
If that result is not true yet, leave the box unchecked. Write what is missing in your notes; use the official instructions below when the equipment or situation differs.
STEP 6 OF 9
Replace the correct filter and seal
Start here: Fit the correct filter and seal.
Example: Fit the correct filter and seal. Follow the written step.
Follow the exact filter instructions.
A spin-on filter’s old gasket must not remain stuck to the engine; two gaskets can leak.
A cartridge housing may need an O-ring in a precise groove and a specified torque.
Lubricate seals only as instructed and do not overtighten.
Before moving to the next step
Check this specific result: The old seal is removed and the new filter/seals are correctly fitted.
If that result is not true yet, leave the box unchecked. Write what is missing in your notes; use the official instructions below when the equipment or situation differs.
STEP 7 OF 9
Refill and verify the level
Start here: Refill and verify the level
Illustration: Measure and check. Read the steps for your exact task.
With the vehicle level as the manual requires, add the specified oil through the engine’s oil-fill opening using a clean funnel.
Follow the staged fill and dipstick/electronic-level procedure; do not exceed the maximum.
Replace the cap and dipstick before operation.
Before moving to the next step
Check this specific result: The correct oil is filled and verified by the manual’s level check.
If that result is not true yet, leave the box unchecked. Write what is missing in your notes; use the official instructions below when the equipment or situation differs.
STEP 8 OF 9
Inspect before and after the specified check run
Start here: Inspect using the manual check sequence.
Example: Inspect using the manual check sequence. Follow the written step.
Remove tools and clear people from the vehicle.
Lower/remove supports only using the approved procedure.
Follow the manual’s check-run and wait/recheck sequence in a safe outdoor area.
If the oil-pressure warning remains on or a leak appears, shut off immediately and get help.
Do not run an engine in a garage.
Before moving to the next step
Check this specific result: There are no leaks or abnormal warnings, and the final level is correct.
If that result is not true yet, leave the box unchecked. Write what is missing in your notes; use the official instructions below when the equipment or situation differs.
STEP 9 OF 9
Recycle and record
Start here: Recycle used oil and log the service.
Example: Recycle used oil and log the service. Follow the written step.
Put used oil in a clean, sealed container; do not mix with coolant or other chemicals.
Take oil and the used filter to an accepting recycling/collection site.
Record date, mileage, oil/filter used, and the next service interval.
Reset a reminder only after the service is complete.
Before moving to the next step
Check this specific result: Used materials are handled properly and the service is logged.
If that result is not true yet, leave the box unchecked. Write what is missing in your notes; use the official instructions below when the equipment or situation differs.
Pictures for this guide
Picture 1 of 9 · Confirm what vehicle you have
Confirm what vehicle you have: Gas, diesel, or hybrid engine?. A full EV has no engine-oil change.
For: Confirm what vehicle you have
Illustrations show examples of the actions above. Follow your equipment’s instructions.
Notes about these pictures
A gasoline/diesel engine uses engine oil. A hybrid may too; it must be fully off and prevented from restarting as its manual requires. A full EV has no combustion-engine oil change, but still has other manufacturer maintenance. Find your engine and model year, not just the vehicle name.
A young or first-time learner should practice with a capable adult or qualified instructor in a safe place. Your vehicle and tool manuals decide the exact procedure. Calling roadside assistance is a successful safe choice. This is a supervised workshop task for a beginner. Never crawl under a vehicle supported only by a jack. If you cannot verify support points, drain-plug identity, capacity, seals, and torque, use a qualified shop.
Was this step clear?
Flag “Confirm what vehicle you have” for review. We save the guide and step identifiers with your account to limit duplicates, not your private notes.
What to look for: This uses a Chrysler PT Cruiser. Other vehicles have different oil, fasteners, capacity, torque, lifting points, and intervals; follow your manual and never work under a jack alone.
Link details checked 2026-10-03. Video availability and equipment menus can change.
These YouTube videos belong to their respective creators. Life’s Checklists does not own them and is not affiliated with the creators. Links open on YouTube, where the videos are available independently of our membership.
How to use the video with this guide
Read “Before you begin” first. Watch the relevant part, pause, then return to the written step and its completion check. Use captions and playback speed if they help. A demonstration may cover only part of the task or show different equipment.
Your model’s instructions and current official guidance take priority. For urgent problems, follow the stop instructions without waiting to watch a video.
For this guide, the final result is: Used materials are handled properly and the service is logged.
A concrete way to approach this task
Use the exact engine specification and maintenance instructions to prepare a parts and tools list before starting.
What if I cannot complete a step?
If access, support, oil specification, or disposal arrangements are uncertain, use a qualified service rather than starting a task you cannot finish safely.
Identify the exact step: “Confirm what vehicle you have.” Record what you tried, what happened, and which item or model you used. Ask for help with that specific problem rather than repeating an unsafe or unsuccessful action.
A young or first-time learner should practice with a capable adult or qualified instructor in a safe place. Your vehicle and tool manuals decide the exact procedure. Calling roadside assistance is a successful safe choice. This is a supervised workshop task for a beginner. Never crawl under a vehicle supported only by a jack. If you cannot verify support points, drain-plug identity, capacity, seals, and torque, use a qualified shop.
Connect this skill to everyday life
Set a total purchase and running budget before shopping. Arrange an independent inspection and collect written terms for the specific vehicle.
A low monthly payment can come with a longer term or higher total cost. A vehicle history report is not a substitute for inspecting its current condition.