Read recipe amounts and measure dry and liquid ingredients
Learn which measuring tool to pick, what the little labels mean, and how to check an amount before mixing. Start with room-temperature water for liquid practice.
Why it matters: The same ingredient can give a different result when you guess the amount or pack a cup differently. Careful measuring makes a recipe easier to repeat.
Written guidance reviewed: 2026-11-01 · Sources and equipment assumptions are below.
Take this guide to another device
Steps, notes, supplies, setup choices, results and check dates save on this browser as you work. Plus can also keep an account copy. Account copies update only when you choose Save; loading one replaces the browser draft shown here.
Review all saved work. Saved account check dates appear in My Day. Clear the date and save again to finish a follow-up. Email settings stay separate; existing opted-in agenda or deadline emails can include these dated actions.
Understand the job before starting
The same ingredient can give a different result when you guess the amount or pack a cup differently. Careful measuring makes a recipe easier to repeat.
A common mistake to avoid
If you have already mixed in an uncertain extra amount, pause and check the recipe publisher advice; do not invent a correction. If the jug markings are unreadable, choose a clearer tool or ask someone to help. A kitchen scale can be useful when the recipe gives weights, but it does not make an unknown cup-to-gram conversion reliable. Do not use cooking measuring advice for medicines.
Words used in this guide
Rent
The amount paid to use someone else’s property for an agreed time. Read the example
Use what you already have. Check each item when it is ready.
Before you begin
This is measuring practice, not a complete cooking recipe. Use food utensils only, never tools used for chemicals or medicines. Check food allergies and ingredient labels before handling food. Do not taste raw flour, dough or batter. Keep this practice away from heat and sharp knives. If recipe units or instructions are unclear, stop and check the publisher rather than guessing a conversion.
0 of 4 steps checked0%
Guide progress and notes save on this browser; choose Save account copy above to carry them to another device with Plus. Downloads contain the complete blank checklist; print to include your current checks and notes.
Do it with me
Your step position saves on this browser. Use the picture when available, then check the written result.
STEP 1 OF 4
Read the amount, unit and ingredient together
Start here: Match each recipe line to the exact labeled measuring tool.
Illustration: Read the amount, unit and ingredient together. Read the steps for your exact task.
Read-aloud is available in supported browsers; the written steps always remain available.
An ingredient is a food used in a recipe.
The amount tells you how much, and the unit tells you how it is measured.
In many U.S. recipes, tsp means teaspoon and tbsp means tablespoon.
They are different sizes.
Use the words printed on measuring spoons, not an ordinary eating spoon.
A cup is a measured volume, not any drinking mug.
One-half, written 1/2, means one of two equal parts.
Use a cup labeled 1/2 cup when that is requested.
Cup and spoon standards can differ by country.
Match your tools to the recipe system; do not mix cup, gram and milliliter amounts by guessing.
Before moving to the next step
Check this specific result: I identified each ingredient, amount and unit, and matched the recipe system to my tools.
If that result is not true yet, leave the box unchecked. Write what is missing in your notes; use the official instructions below when the equipment or situation differs.
STEP 1 OF 4
Read the amount, unit and ingredient together
Start here: Match each recipe line to the exact labeled measuring tool.
Illustration: Read the amount, unit and ingredient together. Read the steps for your exact task.
An ingredient is a food used in a recipe.
The amount tells you how much, and the unit tells you how it is measured.
In many U.S. recipes, tsp means teaspoon and tbsp means tablespoon.
They are different sizes.
Use the words printed on measuring spoons, not an ordinary eating spoon.
A cup is a measured volume, not any drinking mug.
One-half, written 1/2, means one of two equal parts.
Use a cup labeled 1/2 cup when that is requested.
Cup and spoon standards can differ by country.
Match your tools to the recipe system; do not mix cup, gram and milliliter amounts by guessing.
Before moving to the next step
Check this specific result: I identified each ingredient, amount and unit, and matched the recipe system to my tools.
If that result is not true yet, leave the box unchecked. Write what is missing in your notes; use the official instructions below when the equipment or situation differs.
STEP 2 OF 4
Measure a dry ingredient without guessing the top
Start here: For an ordinary level measure, spoon in the ingredient and level the rim.
Illustration: Measure a dry ingredient without guessing the top. Read the steps for your exact task.
A dry measuring cup is filled to its top edge.
Choose the marked size the recipe asks for and set a clean bowl underneath to catch excess.
For flour, gently loosen it, spoon it into the cup, then sweep across the rim with a blunt straight edge such as the back of a butter knife.
Level means flat with the rim, without a mound.
Do not press, shake or tap the flour down.
Small dry amounts use the correctly labeled measuring spoon and a level top too.
Follow special recipe wording: packed brown sugar needs a different method.
Do not taste raw flour or use a sharp cutting edge for this task.
Before moving to the next step
Check this specific result: I used the requested dry measure and followed the recipe level or packed instruction.
If that result is not true yet, leave the box unchecked. Write what is missing in your notes; use the official instructions below when the equipment or situation differs.
STEP 3 OF 4
Read liquid at its marked line
Start here: Put the jug on a flat surface and check the correct line at eye level.
Illustration: Read liquid at its marked line. Read the steps for your exact task.
A liquid measuring jug has amount lines below its rim and usually a spout for pouring.
Use room-temperature water for practice.
Put the jug on a stable flat surface, find the requested line and pour slowly toward it.
Bring your eyes level with the liquid rather than lifting a full jug near your face.
Add a little more or pour some out until the water reaches that line.
Read the scale that matches the recipe, such as cups or mL.
Milliliters, written mL, measure volume.
Grams, written g, measure mass on a kitchen scale; a cup of different ingredients does not always weigh the same.
Use a recipe published weight if measuring by scale.
Before moving to the next step
Check this specific result: My jug is flat and the liquid reaches the correct line on the intended scale.
If that result is not true yet, leave the box unchecked. Write what is missing in your notes; use the official instructions below when the equipment or situation differs.
STEP 4 OF 4
Check each amount before mixing
Start here: Compare the measured ingredient with the recipe and mark it once.
Illustration: Check each amount before mixing. Read the steps for your exact task.
Read the ingredient line again before adding it to a real recipe.
Keep wet tools out of dry ingredient containers.
Mark the ingredient after adding it so you do not add it twice.
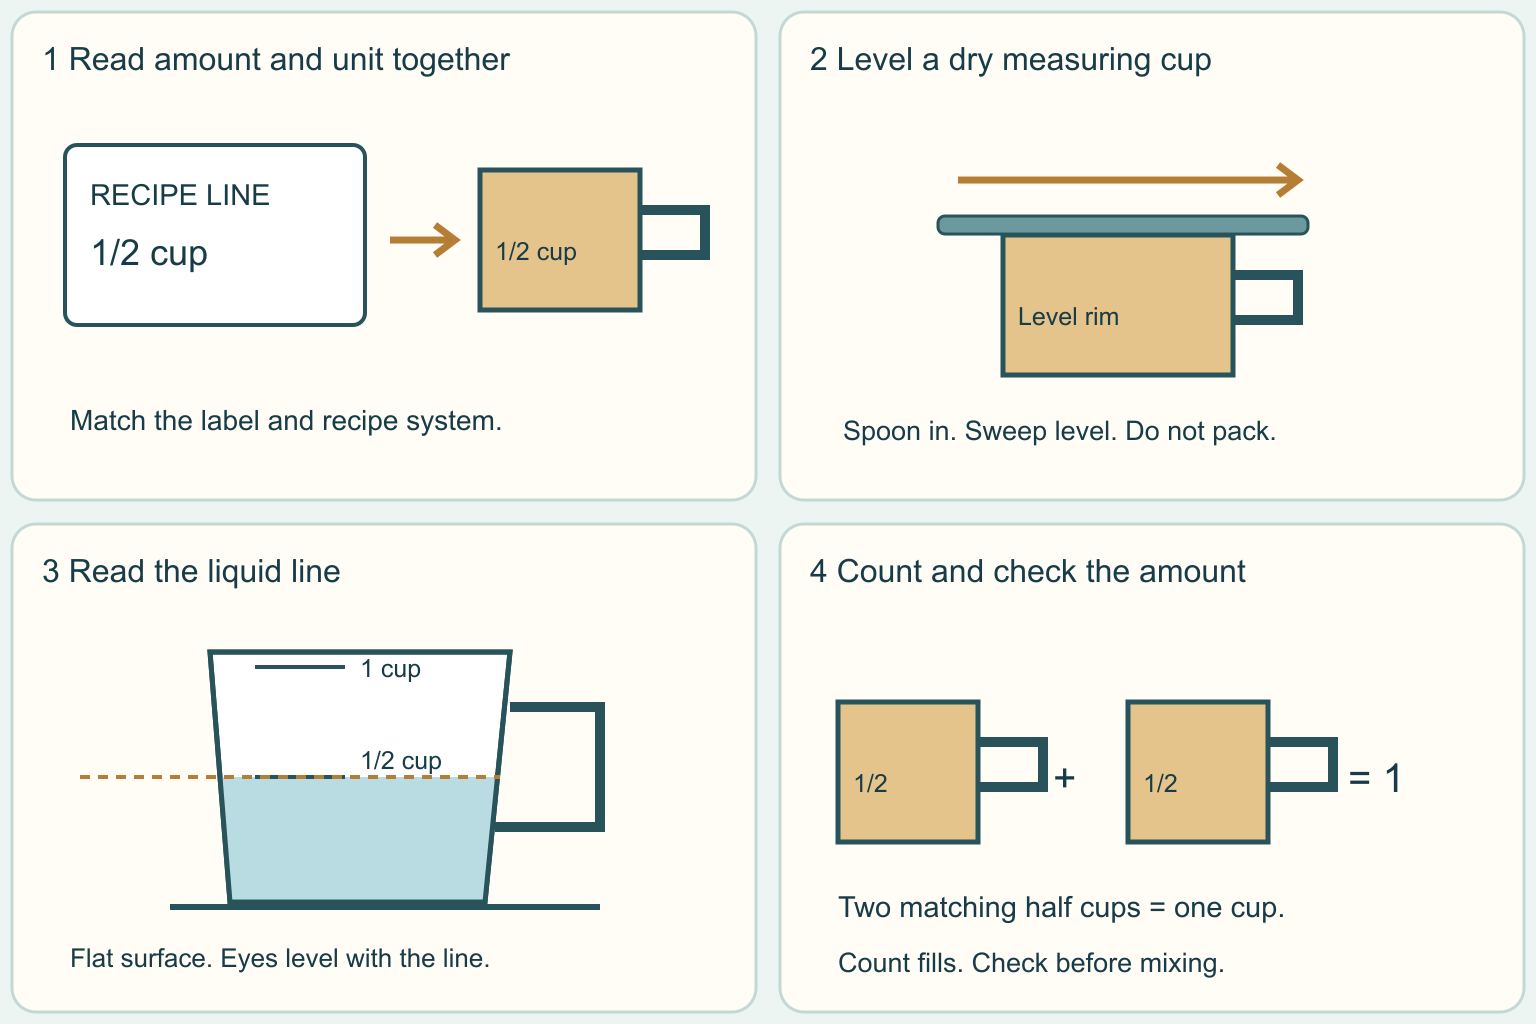
If the recipe asks for 1 cup and you only have a matching 1/2-cup measure, two level fills make 1 cup: 1/2 plus 1/2 equals 1.
Count the fills aloud or on paper.
Keep the same recipe system.
These practice examples are not a recipe to mix or eat.
Wash and dry the tools and work surface afterward, and wash your hands after handling raw flour.
Before moving to the next step
Check this specific result: I checked the ingredient and unit, recorded any repeated fills, and cleaned up safely.
If that result is not true yet, leave the box unchecked. Write what is missing in your notes; use the official instructions below when the equipment or situation differs.
Pictures for this guide
Picture 1 of 4 · Read the amount, unit and ingredient together
A recipe amount of one-half cup points to a dry cup labeled one-half cup, not a drinking mug.
For: Read the amount, unit and ingredient together
Illustrations show examples of the actions above. Follow your equipment’s instructions.
Notes about these pictures
An ingredient is a food used in a recipe. The amount tells you how much, and the unit tells you how it is measured. In many U.S. recipes, tsp means teaspoon and tbsp means tablespoon. They are different sizes. Use the words printed on measuring spoons, not an ordinary eating spoon. A cup is a measured volume, not any drinking mug. One-half, written 1/2, means one of two equal parts. Use a cup labeled 1/2 cup when that is requested. Cup and spoon standards can differ by country. Match your tools to the recipe system; do not mix cup, gram and milliliter amounts by guessing.
This is measuring practice, not a complete cooking recipe. Use food utensils only, never tools used for chemicals or medicines. Check food allergies and ingredient labels before handling food. Do not taste raw flour, dough or batter. Keep this practice away from heat and sharp knives. If recipe units or instructions are unclear, stop and check the publisher rather than guessing a conversion.
Was this step clear?
Flag “Read the amount, unit and ingredient together” for review. We save the guide and step identifiers with your account to limit duplicates, not your private notes.
A specific companion has not been selected for this new guide yet. You can search for related demonstrations; search results have not been reviewed by Life’s Checklists.
These YouTube videos belong to their respective creators. Life’s Checklists does not own them and is not affiliated with the creators. Links open on YouTube, where the videos are available independently of our membership.
How to use the video with this guide
Read “Before you begin” first. Watch the relevant part, pause, then return to the written step and its completion check. Use captions and playback speed if they help. A demonstration may cover only part of the task or show different equipment.
Your model’s instructions and current official guidance take priority. For urgent problems, follow the stop instructions without waiting to watch a video.
Finish the job and know what to do next.
For this guide, the final result is: I checked the ingredient and unit, recorded any repeated fills, and cleaned up safely.
A concrete way to approach this task
Fictional measuring exercise: read 1/2 cup water on a matching jug. Separately, if a real recipe in the same system calls for 1 cup flour, two level 1/2-cup fills equal 1 cup. Do not combine these practice amounts as a recipe. A real recipe supplies all ingredients, method and cooking instructions.
What if I cannot complete a step?
If you have already mixed in an uncertain extra amount, pause and check the recipe publisher advice; do not invent a correction. If the jug markings are unreadable, choose a clearer tool or ask someone to help. A kitchen scale can be useful when the recipe gives weights, but it does not make an unknown cup-to-gram conversion reliable. Do not use cooking measuring advice for medicines.
Identify the exact step: “Read the amount, unit and ingredient together.” Record what you tried, what happened, and which item or model you used. Ask for help with that specific problem rather than repeating an unsafe or unsuccessful action.
This is measuring practice, not a complete cooking recipe. Use food utensils only, never tools used for chemicals or medicines. Check food allergies and ingredient labels before handling food. Do not taste raw flour, dough or batter. Keep this practice away from heat and sharp knives. If recipe units or instructions are unclear, stop and check the publisher rather than guessing a conversion.
Connect this skill to everyday life
Check what food you own, what equipment you can use, and how many portions you need. Choose one simple meal before planning a whole week.
An exact ingredient match does not prove you own enough. Rice and rice vinegar are different; diced tomato and tomato sauce are different. Leftovers still need safe handling.
A useful record for this task: Record the result of “Check each amount before mixing”: I checked the ingredient and unit, recorded any repeated fills, and cleaned up safely.
When finished, record the result and any next check or follow-up date. Your original step checks and notes remain on this browser.
Keep the result of your work
Finish and check every step before recording completion. You can write a draft below now.
Result: Not recorded · Next check: Not chosen
Choose a date from your own manual or situation. No email is enabled by saving this record.