Learn which address goes where, what postage means, and where to take a simple letter. This guide uses U.S. Postal Service rules; other countries have their own postal instructions.
Why it matters: A letter can go to the wrong place if a name, apartment number, or postal code is missing. Checking before you seal it saves another trip.
Written guidance reviewed: 2026-10-17 · Sources and equipment assumptions are below.
Take this guide to another device
Steps, notes, supplies, setup choices, results and check dates save on this browser as you work. Plus can also keep an account copy. Account copies update only when you choose Save; loading one replaces the browser draft shown here.
Review all saved work. Saved account check dates appear in My Day. Clear the date and save again to finish a follow-up. Email settings stay separate; existing opted-in agenda or deadline emails can include these dated actions.
Understand the job before starting
A letter can go to the wrong place if a name, apartment number, or postal code is missing. Checking before you seal it saves another trip.
A common mistake to avoid
If mail comes back, read the return marking and confirm the recipient’s exact address before paying to resend it. If an office has a deadline, ask that office which delivery methods and evidence it accepts.
Use what you already have. Check each item when it is ready.
Before you begin
This guide is for ordinary paper correspondence, not parcels, valuables, or time-critical legal documents. Follow the receiving office’s requirements for originals, signatures, delivery method, and deadlines. Outside the U.S., use your national postal service’s rules.
0 of 4 steps checked0%
Guide progress and notes save on this browser; choose Save account copy above to carry them to another device with Plus. Downloads contain the complete blank checklist; print to include your current checks and notes.
Do it with me
Your step position saves on this browser. Use the picture when available, then check the written result.
STEP 1 OF 4
Prepare the paper and a suitable envelope
Start here: Prepare the paper and a suitable envelope
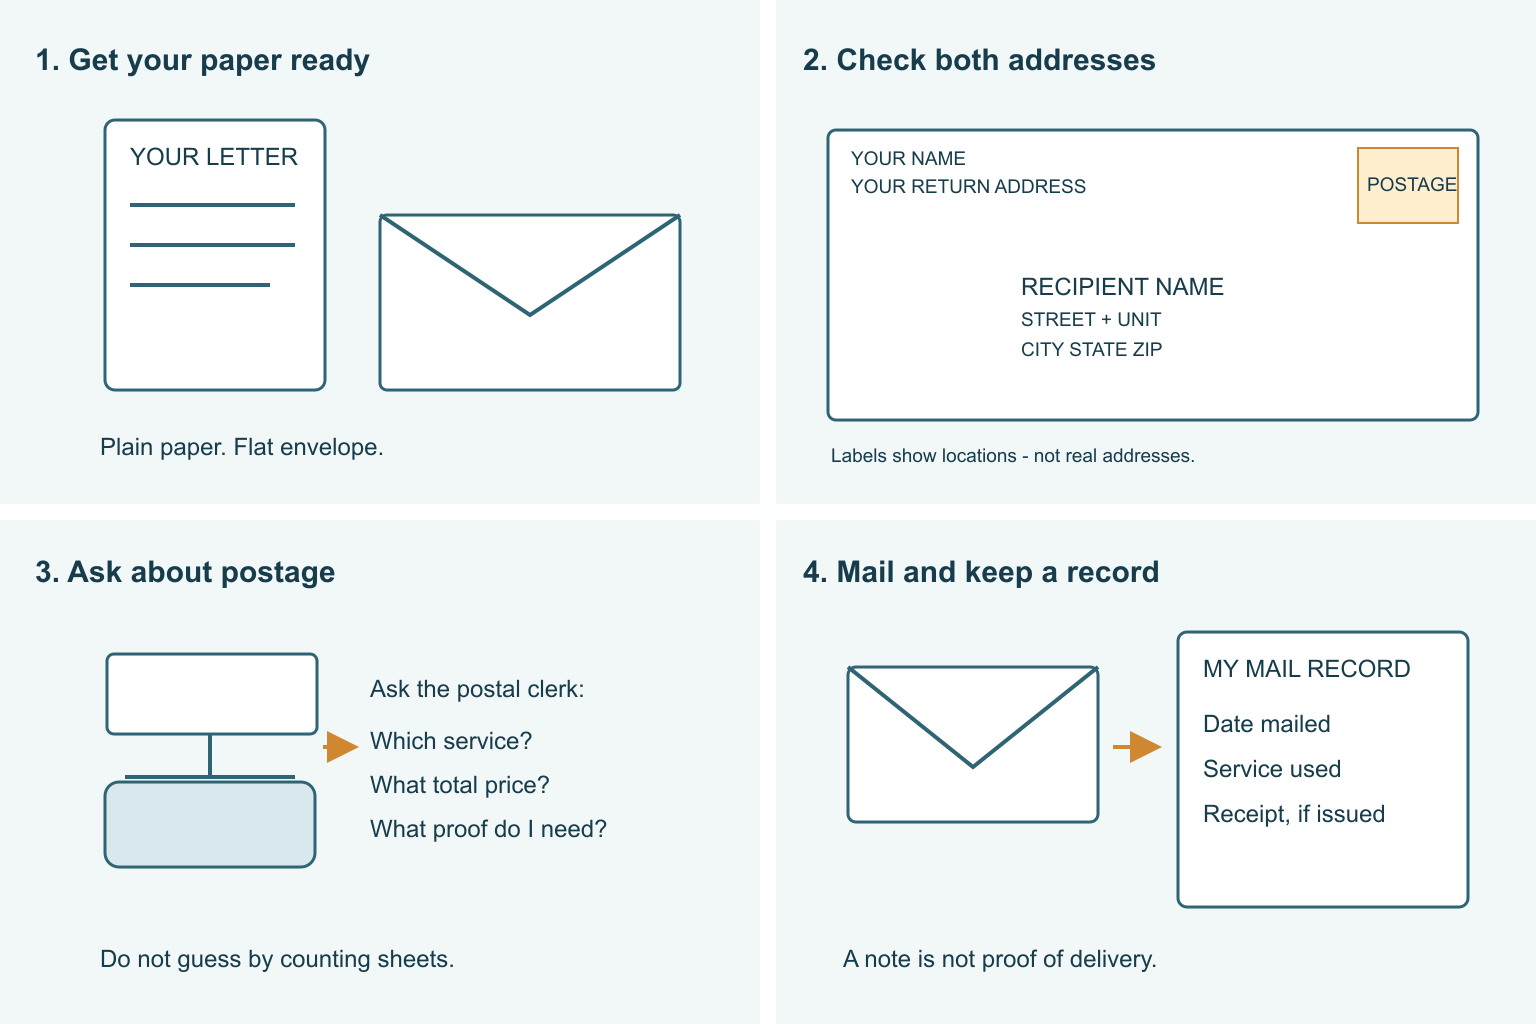
Illustration: Paper and envelope. Read the steps for your exact task.
Read-aloud is available in supported browsers; the written steps always remain available.
The recipient is the person or office receiving your letter.
Confirm that they accept mail and ask for the exact mailing address, including any department or apartment.
Finish and sign the paper if requested.
Keep a private copy if you may need it later.
Choose a plain paper business envelope for a small, flat letter.
Do not add keys, coins, or other hard objects.
If the contents are thick, stiff, or unusual, take them to the postal counter instead of guessing the mail type.
Before moving to the next step
Check this specific result: My paper is ready and I confirmed the recipient’s mailing instructions.
If that result is not true yet, leave the box unchecked. Write what is missing in your notes; use the official instructions below when the equipment or situation differs.
STEP 1 OF 4
Prepare the paper and a suitable envelope
Start here: Prepare the paper and a suitable envelope
Illustration: Paper and envelope. Read the steps for your exact task.
The recipient is the person or office receiving your letter.
Confirm that they accept mail and ask for the exact mailing address, including any department or apartment.
Finish and sign the paper if requested.
Keep a private copy if you may need it later.
Choose a plain paper business envelope for a small, flat letter.
Do not add keys, coins, or other hard objects.
If the contents are thick, stiff, or unusual, take them to the postal counter instead of guessing the mail type.
Before moving to the next step
Check this specific result: My paper is ready and I confirmed the recipient’s mailing instructions.
If that result is not true yet, leave the box unchecked. Write what is missing in your notes; use the official instructions below when the equipment or situation differs.
STEP 2 OF 4
Write the two addresses on the front
Start here: Write the two addresses on the front
Illustration: Address locations. Read the steps for your exact task.
Put the envelope flat with its long edge horizontal.
The return address means where undeliverable mail should come back: write your name and mailing address at the upper left.
Put the recipient’s name and delivery address in the lower middle.
Include the unit number where needed, then city, two-letter state abbreviation, and ZIP code for a normal U.S. street address.
Print clearly.
Read every line against the address you were given, especially house and apartment numbers.
Do not use the diagram’s placeholder words as a real address.
Before moving to the next step
Check this specific result: Both addresses are readable, complete, and checked against my records.
If that result is not true yet, leave the box unchecked. Write what is missing in your notes; use the official instructions below when the equipment or situation differs.
STEP 3 OF 4
Ask for the right postage before sending
Start here: Ask for the right postage before sending
Illustration: Confirm postage. Read the steps for your exact task.
Postage is the fee for mailing.
A stamp is one way to show that the fee was paid.
Price depends on the item’s size, shape, weight, and service; one stamp is not enough for every envelope.
Find a branch using the official USPS locations page and check counter hours.
Ask, “Can you check the postage for this letter?
I need it to arrive by this date.
What service fits?” Mention any required mailing or delivery proof.
Put the correct stamp or label at the upper right, as instructed.
Before moving to the next step
Check this specific result: The correct postage and any required extra service are confirmed.
If that result is not true yet, leave the box unchecked. Write what is missing in your notes; use the official instructions below when the equipment or situation differs.
STEP 4 OF 4
Seal, hand over, and save what you need
Start here: Seal, hand over, and save what you need
Illustration: Mail and record. Read the steps for your exact task.
Check the contents once more, then seal the flap.
For a first mailing, hand it to a postal counter employee and ask what receipt, if any, you should keep.
Ordinary stamped letters do not automatically give you a delivery tracking number.
If using a collection box, read its collection times and restrictions.
In the U.S., items paid only with stamps that exceed 10 ounces or half an inch thick must go to an employee at a Post Office.
Record when you mailed it and any agreed follow-up date; a personal note is not official proof of delivery.
Before moving to the next step
Check this specific result: My letter has been accepted or deposited correctly, and I saved any needed record.
If that result is not true yet, leave the box unchecked. Write what is missing in your notes; use the official instructions below when the equipment or situation differs.
Pictures for this guide
Picture 1 of 4 · Paper and envelope
A paper letter is placed beside a plain rectangular envelope.
For: Prepare the paper and a suitable envelope
Illustrations show examples of the actions above. Follow your equipment’s instructions.
Notes about these pictures
The recipient is the person or office receiving your letter. Confirm that they accept mail and ask for the exact mailing address, including any department or apartment. Finish and sign the paper if requested. Keep a private copy if you may need it later. Choose a plain paper business envelope for a small, flat letter. Do not add keys, coins, or other hard objects. If the contents are thick, stiff, or unusual, take them to the postal counter instead of guessing the mail type.
This guide is for ordinary paper correspondence, not parcels, valuables, or time-critical legal documents. Follow the receiving office’s requirements for originals, signatures, delivery method, and deadlines. Outside the U.S., use your national postal service’s rules.
Was this step clear?
Flag “Prepare the paper and a suitable envelope” for review. We save the guide and step identifiers with your account to limit duplicates, not your private notes.
What to look for: Official USPS video linked from its letter guide. U.S. domestic mail only; check current prices and service rules on USPS.com. Video link verified; full playback not independently tested.
Link details checked 2026-10-17. Video availability and equipment menus can change.
These YouTube videos belong to their respective creators. Life’s Checklists does not own them and is not affiliated with the creators. Links open on YouTube, where the videos are available independently of our membership.
How to use the video with this guide
Read “Before you begin” first. Watch the relevant part, pause, then return to the written step and its completion check. Use captions and playback speed if they help. A demonstration may cover only part of the task or show different equipment.
Your model’s instructions and current official guidance take priority. For urgent problems, follow the stop instructions without waiting to watch a video.
For this guide, the final result is: My letter has been accepted or deposited correctly, and I saved any needed record.
A concrete way to approach this task
You want to send a thank-you note. First ask for the correct mailing address. Write your return address at upper left and the recipient’s address lower down. Ask a postal clerk to confirm postage if you are unsure.
What if I cannot complete a step?
If mail comes back, read the return marking and confirm the recipient’s exact address before paying to resend it. If an office has a deadline, ask that office which delivery methods and evidence it accepts.
Identify the exact step: “Prepare the paper and a suitable envelope.” Record what you tried, what happened, and which item or model you used. Ask for help with that specific problem rather than repeating an unsafe or unsuccessful action.
This guide is for ordinary paper correspondence, not parcels, valuables, or time-critical legal documents. Follow the receiving office’s requirements for originals, signatures, delivery method, and deadlines. Outside the U.S., use your national postal service’s rules.
Connect this skill to everyday life
Identify the receiving organization and ask for its exact document requirements before gathering copies. Make a list of document types and where originals are kept.
A copy, a certified copy, and an original are different. A planning template does not replace an official form when one is required.
A useful record for this task: Record the result of “Seal, hand over, and save what you need”: My letter has been accepted or deposited correctly, and I saved any needed record.
When finished, record the result and any next check or follow-up date. Your original step checks and notes remain on this browser.
Keep the result of your work
Finish and check every step before recording completion. You can write a draft below now.
Result: Not recorded · Next check: Not chosen
Choose a date from your own manual or situation. No email is enabled by saving this record.