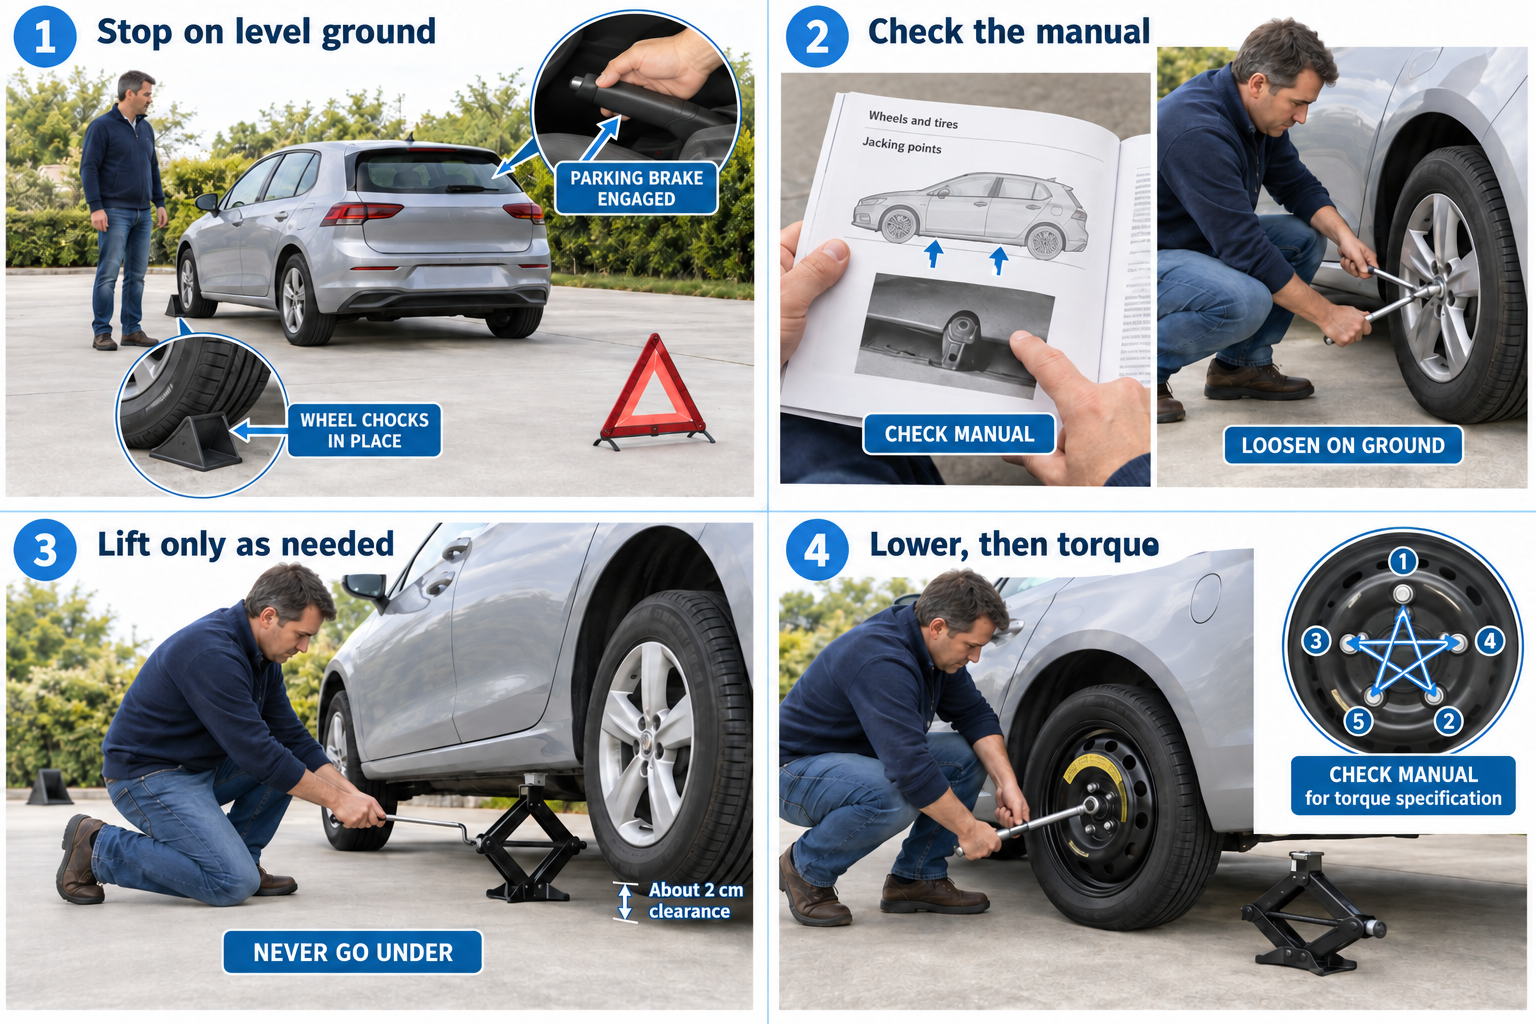
A jack lifts the car at a designed point. Lug nuts or bolts hold the wheel on. A torque wrench measures correct tightening.
Why it matters: A car can fall if lifted incorrectly, and a poorly secured wheel can come off. Practice before you have a roadside emergency.
Written guidance reviewed: September 17, 2026 · Sources and equipment assumptions are below.
Take this guide to another device
Steps, notes, supplies, setup choices, results and check dates save on this browser as you work. Plus can also keep an account copy. Account copies update only when you choose Save; loading one replaces the browser draft shown here.
Review all saved work. Saved account check dates appear in My Day. Clear the date and save again to finish a follow-up. Email settings stay separate; existing opted-in agenda or deadline emails can include these dated actions.
Understand the job before starting
A spare and tools do not make every roadside location suitable for changing a tire.
A common mistake to avoid
Using a remembered jacking point from another vehicle can be unsafe.
Use what you already have. Check each item when it is ready.
Before you begin
A young or first-time learner should practice with a capable adult or qualified instructor in a safe place. Your vehicle and tool manuals decide the exact procedure. Calling roadside assistance is a successful safe choice. Do not work beside fast traffic, on a slope, on soft ground, or with a damaged lifting point. Never place any part of your body under a car supported only by a jack.
0 of 8 steps checked0%
Guide progress and notes save on this browser; choose Save account copy above to carry them to another device with Plus. Downloads contain the complete blank checklist; print to include your current checks and notes.
Do it with me
Your step position saves on this browser. Use the picture when available, then check the written result.
STEP 1 OF 8
Get completely out of danger
Start here: Get completely out of danger
Illustration: Stop on level ground. Read the steps for your exact task.
Read-aloud is available in supported browsers; the written steps always remain available.
If you can reach a safe location without driving on a destroyed tire, stop on firm, level ground away from traffic.
Turn on hazards.
If the location is unsafe, call roadside assistance instead of changing the tire.
Follow local emergency advice on where occupants should wait.
Before moving to the next step
Check this specific result: The location is safe or assistance is on the way.
If that result is not true yet, leave the box unchecked. Write what is missing in your notes; use the official instructions below when the equipment or situation differs.
STEP 1 OF 8
Get completely out of danger
Start here: Get completely out of danger
Illustration: Stop on level ground. Read the steps for your exact task.
If you can reach a safe location without driving on a destroyed tire, stop on firm, level ground away from traffic.
Turn on hazards.
If the location is unsafe, call roadside assistance instead of changing the tire.
Follow local emergency advice on where occupants should wait.
Before moving to the next step
Check this specific result: The location is safe or assistance is on the way.
If that result is not true yet, leave the box unchecked. Write what is missing in your notes; use the official instructions below when the equipment or situation differs.
STEP 2 OF 8
Secure the vehicle
Start here: Secure the vehicle as its manual says.
Example: Secure the vehicle as its manual says. Follow the written step.
Turn the vehicle fully off, select Park or the manual-specified gear, and set the parking brake.
Chock the wheel diagonally opposite the flat on both sides as directed.
Check that the spare has usable pressure and is compatible.
Do not assume every car includes a spare.
Before moving to the next step
Check this specific result: The car is off, secured, chocked, and has a usable spare.
If that result is not true yet, leave the box unchecked. Write what is missing in your notes; use the official instructions below when the equipment or situation differs.
STEP 3 OF 8
Find the exact jack point and torque
Start here: Find model-specific specifications.
Example: Find model-specific specifications. Follow the written step.
Open the vehicle manual’s tire-change section.
Find the lifting point nearest the flat and the lug-nut torque.
Some EVs/hybrids need special pads or a suspension setting; use only the documented procedure.
Do not lift under a battery pack, floor sheet metal, or guessed location.
Before moving to the next step
Check this specific result: I located the specified jack point and torque.
If that result is not true yet, leave the box unchecked. Write what is missing in your notes; use the official instructions below when the equipment or situation differs.
STEP 4 OF 8
Loosen the lugs while the tire is on the ground
Start here: Loosen the lugs while the tire is on the ground
Illustration: Check the manual. Read the steps for your exact task.
Remove the wheel cover only as directed.
Fit the correct wrench fully over a lug.
Loosen each about a quarter to half turn, usually counterclockwise; do not remove them yet.
Use the wheel-lock key where needed.
Do not jump on the wrench or improvise a pipe extension.
Before moving to the next step
Check this specific result: All lugs are loosened slightly, with the wheel still grounded.
If that result is not true yet, leave the box unchecked. Write what is missing in your notes; use the official instructions below when the equipment or situation differs.
STEP 5 OF 8
Raise only enough to remove the wheel
Start here: Raise only enough to remove the wheel
Illustration: Lift only as needed. Read the steps for your exact task.
Position the approved jack exactly as the manual shows on a firm base.
Lift just until the tire clears.
Keep all body parts out from underneath.
If the jack tilts, shifts, or the car moves, stop and arrange help; do not try to catch the car.
Before moving to the next step
Check this specific result: The jack is stable at the approved point and I stay out from under it.
If that result is not true yet, leave the box unchecked. Write what is missing in your notes; use the official instructions below when the equipment or situation differs.
STEP 6 OF 8
Remove the flat and fit the spare
Start here: Fit the spare as instructed.
Example: Fit the spare as instructed. Follow the written step.
Finish removing lugs and put them in a container.
Pull the wheel straight off while staying outside the underside.
If stuck or too heavy, ask for help.
Align the spare’s holes and seat it flush.
Thread each lug by hand; it should turn freely without cross-threading.
Before moving to the next step
Check this specific result: The spare is seated and every lug started by hand.
If that result is not true yet, leave the box unchecked. Write what is missing in your notes; use the official instructions below when the equipment or situation differs.
STEP 7 OF 8
Lower and tighten correctly
Start here: Lower and tighten correctly
Illustration: Lower, then torque. Read the steps for your exact task.
Snug the lugs evenly in the manual’s crossing/star order.
Lower until the tire contacts the ground as directed, then tighten with a torque wrench to the exact specification in the proper pattern.
Do not use a generic number from another car.
Arrange qualified help if you cannot verify torque.
Before moving to the next step
Check this specific result: Every lug is tightened in sequence to the specified torque.
If that result is not true yet, leave the box unchecked. Write what is missing in your notes; use the official instructions below when the equipment or situation differs.
STEP 8 OF 8
Stow tools and follow spare limits
Start here: Stow everything and follow spare limits.
Example: Stow everything and follow spare limits. Follow the written step.
Lower fully and remove the jack/chocks as directed.
Secure the flat and tools.
Read the spare’s speed and distance limits; temporary spares are for reaching repair, not normal long-term driving.
Have the tire repaired/replaced and follow the manual’s recheck instructions.
Before moving to the next step
Check this specific result: Tools are secured and I know the spare’s limits.
If that result is not true yet, leave the box unchecked. Write what is missing in your notes; use the official instructions below when the equipment or situation differs.
Pictures for this guide
Picture 1 of 8 · Stop on level ground
A car is parked in a private level area with a warning triangle, parking brake indication, and wheel chock close-up.
For: Get completely out of danger
Illustrations show examples of the actions above. Follow your equipment’s instructions.
Notes about these pictures
If you can reach a safe location without driving on a destroyed tire, stop on firm, level ground away from traffic. Turn on hazards. If the location is unsafe, call roadside assistance instead of changing the tire. Follow local emergency advice on where occupants should wait.
A young or first-time learner should practice with a capable adult or qualified instructor in a safe place. Your vehicle and tool manuals decide the exact procedure. Calling roadside assistance is a successful safe choice. Do not work beside fast traffic, on a slope, on soft ground, or with a damaged lifting point. Never place any part of your body under a car supported only by a jack.
Was this step clear?
Flag “Get completely out of danger” for review. We save the guide and step identifiers with your account to limit duplicates, not your private notes.
What to look for: See the sequence as background. The written guide and vehicle manual decide jack points, spare limits, and when roadside assistance is the safer choice.
Link details checked 2026-10-03. Video availability and equipment menus can change.
These YouTube videos belong to their respective creators. Life’s Checklists does not own them and is not affiliated with the creators. Links open on YouTube, where the videos are available independently of our membership.
How to use the video with this guide
Read “Before you begin” first. Watch the relevant part, pause, then return to the written step and its completion check. Use captions and playback speed if they help. A demonstration may cover only part of the task or show different equipment.
Your model’s instructions and current official guidance take priority. For urgent problems, follow the stop instructions without waiting to watch a video.
For this guide, the final result is: Tools are secured and I know the spare’s limits.
A concrete way to approach this task
Find the vehicle manual and check the location and condition before preparing any equipment.
What if I cannot complete a step?
If the situation does not meet the guide’s safe conditions, arrange roadside help. Having a spare does not make every roadside location suitable.
Identify the exact step: “Get completely out of danger.” Record what you tried, what happened, and which item or model you used. Ask for help with that specific problem rather than repeating an unsafe or unsuccessful action.
A young or first-time learner should practice with a capable adult or qualified instructor in a safe place. Your vehicle and tool manuals decide the exact procedure. Calling roadside assistance is a successful safe choice. Do not work beside fast traffic, on a slope, on soft ground, or with a damaged lifting point. Never place any part of your body under a car supported only by a jack.
Connect this skill to everyday life
Set a total purchase and running budget before shopping. Arrange an independent inspection and collect written terms for the specific vehicle.
A low monthly payment can come with a longer term or higher total cost. A vehicle history report is not a substitute for inspecting its current condition.