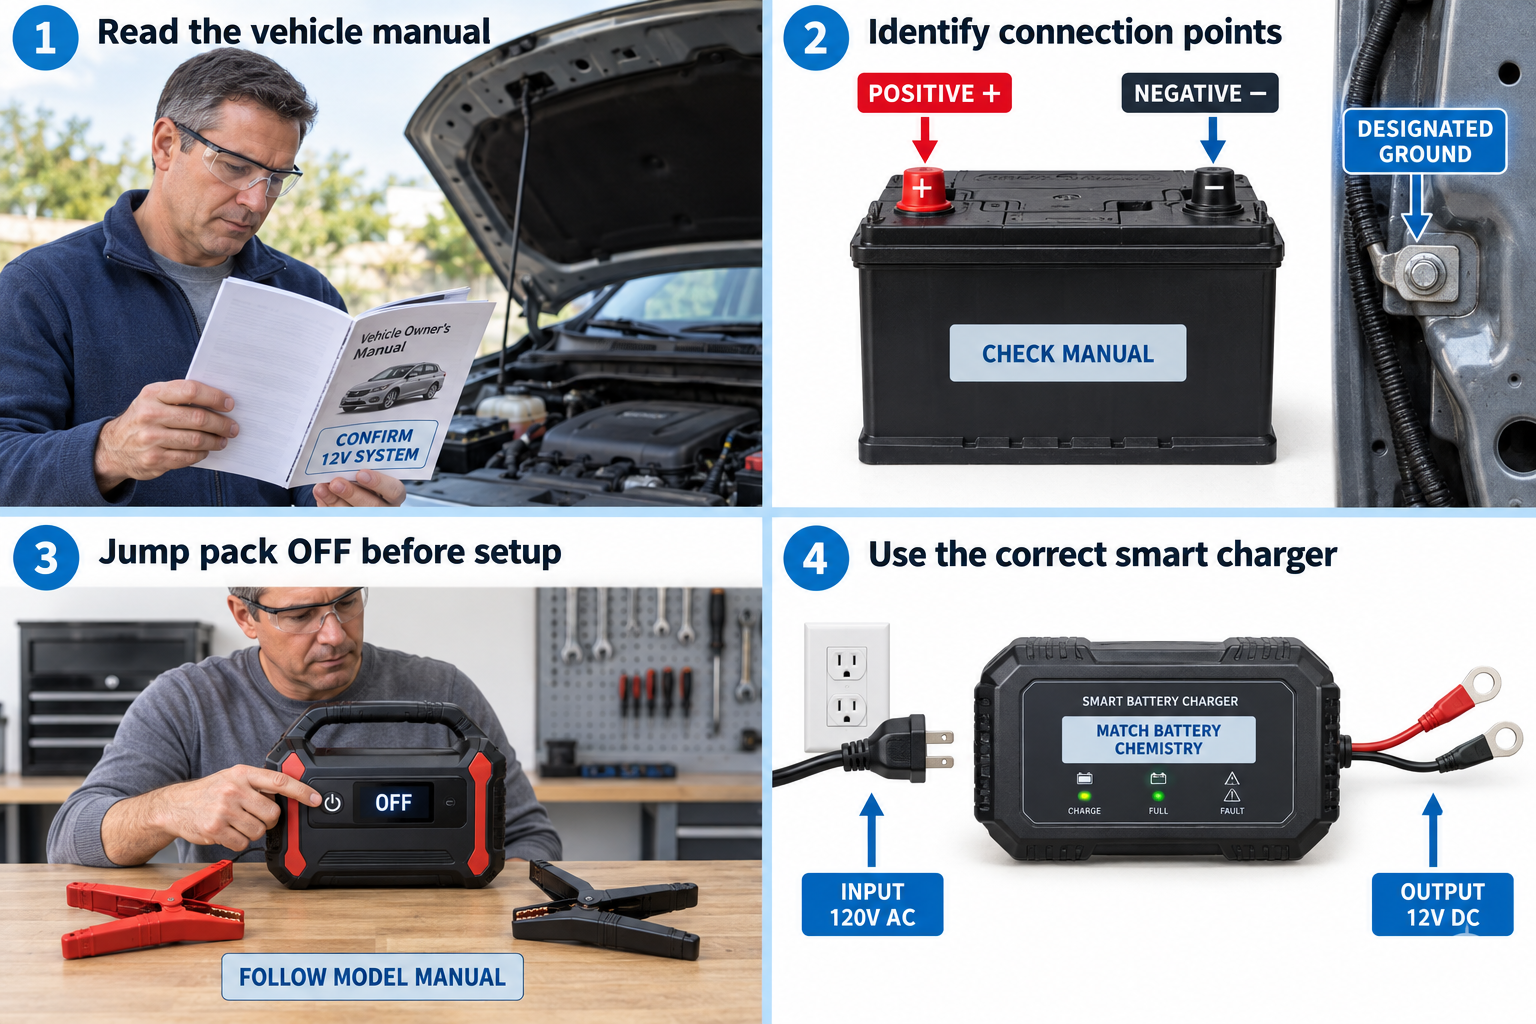
A charger takes household AC power and converts it to controlled DC power for a battery. It is different from a jump starter.
Why it matters: Voltage, battery chemistry, charging current, and connection points must match. A low-current charger may take a long time.
Written guidance reviewed: September 17, 2026 · Sources and equipment assumptions are below.
Take this guide to another device
Steps, notes, supplies, setup choices, results and check dates save on this browser as you work. Plus can also keep an account copy. Account copies update only when you choose Save; loading one replaces the browser draft shown here.
Review all saved work. Saved account check dates appear in My Day. Clear the date and save again to finish a follow-up. Email settings stay separate; existing opted-in agenda or deadline emails can include these dated actions.
Understand the job before starting
Charger mode, battery type and vehicle instructions must agree.
A common mistake to avoid
Choosing a mode by trial and error is not a compatibility check.
Words used in this guide
Budget
A plan that gives your expected money specific jobs. Read the example
Rent
The amount paid to use someone else’s property for an agreed time. Read the example
Use what you already have. Check each item when it is ready.
Before you begin
A young or first-time learner should practice with a capable adult or qualified instructor in a safe place. Your vehicle and tool manuals decide the exact procedure. Calling roadside assistance is a successful safe choice. Do not charge a damaged, leaking, swollen, or frozen battery. Never connect a household outlet directly to battery terminals. Do not use a car charger on an EV high-voltage battery.
0 of 6 steps checked0%
Guide progress and notes save on this browser; choose Save account copy above to carry them to another device with Plus. Downloads contain the complete blank checklist; print to include your current checks and notes.
Do it with me
Your step position saves on this browser. Use the picture when available, then check the written result.
STEP 1 OF 6
Read the battery label
Start here: Read the battery label
Illustration: Use the correct smart charger. Read the steps for your exact task.
Read-aloud is available in supported browsers; the written steps always remain available.
Find whether it is a 12 V lead-acid, AGM, another lead-acid type, or an approved lithium type. “Lithium” alone is not enough to establish compatibility.
The NOCO GENIUS1 example supports listed 6/12 V types and specified LiFePO4 modes; check the current manual and battery maker’s limits.
Before moving to the next step
Check this specific result: The charger supports my exact battery type.
If that result is not true yet, leave the box unchecked. Write what is missing in your notes; use the official instructions below when the equipment or situation differs.
STEP 1 OF 6
Read the battery label
Start here: Read the battery label
Illustration: Use the correct smart charger. Read the steps for your exact task.
Find whether it is a 12 V lead-acid, AGM, another lead-acid type, or an approved lithium type. “Lithium” alone is not enough to establish compatibility.
The NOCO GENIUS1 example supports listed 6/12 V types and specified LiFePO4 modes; check the current manual and battery maker’s limits.
Before moving to the next step
Check this specific result: The charger supports my exact battery type.
If that result is not true yet, leave the box unchecked. Write what is missing in your notes; use the official instructions below when the equipment or situation differs.
STEP 2 OF 6
Understand volts, amps, and watts
Start here: Match charger and battery ratings.
Example: Match charger and battery ratings. Follow the written step.
U.S. outlets commonly supply about 120 volts AC.
A 12-volt charger supplies controlled DC at a charging voltage that can be higher than the battery’s nominal 12 V.
Amps describe current: GENIUS1 is a 1 A charger/maintainer, not a jump pack.
Battery amp-hours describe stored capacity.
Before moving to the next step
Check this specific result: I can distinguish household input from battery output.
If that result is not true yet, leave the box unchecked. Write what is missing in your notes; use the official instructions below when the equipment or situation differs.
STEP 3 OF 6
Estimate time without promising it
Start here: Treat charge time as an estimate.
Example: Treat charge time as an estimate. Follow the written step.
Example: replacing 20 amp-hours at a constant 1 amp would take 20 hours in ideal math.
Real charging takes longer because of losses and the slower final stage.
A 1 A maintainer is a budget option for keeping a healthy battery ready, not a quick fix before work.
Before moving to the next step
Check this specific result: I planned enough time and did not confuse it with jump starting.
If that result is not true yet, leave the box unchecked. Write what is missing in your notes; use the official instructions below when the equipment or situation differs.
STEP 4 OF 6
Connect before energizing
Start here: Follow the unpowered connection steps.
Example: Follow the unpowered connection steps. Follow the written step.
With the charger unplugged/off, follow the vehicle and charger instructions for the positive connection and designated negative/ground connection.
For a battery in a vehicle, the final connection is commonly a specified chassis/engine ground away from the battery.
Do not guess.
Keep leads away from moving or hot parts.
Before moving to the next step
Check this specific result: I made the approved connections with power off.
If that result is not true yet, leave the box unchecked. Write what is missing in your notes; use the official instructions below when the equipment or situation differs.
STEP 5 OF 6
Select the correct mode and monitor
Start here: Use the correct mode and monitor.
Example: Use the correct mode and monitor. Follow the written step.
Plug into the permitted outlet in a dry location, then select the exact supported battery mode.
Read the status lights.
Do not use force, repair, or recovery modes without qualified guidance.
Stop for heat, swelling, leakage, or an error the manual cannot resolve.
Before moving to the next step
Check this specific result: The correct mode is selected and charging appears normal.
If that result is not true yet, leave the box unchecked. Write what is missing in your notes; use the official instructions below when the equipment or situation differs.
STEP 6 OF 6
Disconnect and store
Start here: Disconnect safely and store dry.
Example: Disconnect safely and store dry. Follow the written step.
Follow the manual: stop charging and disconnect AC before removing clamps in its stated order.
Do not let clamps touch.
Secure the battery/vehicle as directed and store the charger dry.
Have a battery that will not hold charge tested.
Before moving to the next step
Check this specific result: The charger is safely disconnected and the battery condition is checked.
If that result is not true yet, leave the box unchecked. Write what is missing in your notes; use the official instructions below when the equipment or situation differs.
Pictures for this guide
Picture 1 of 6 · Use the correct smart charger
A charger illustration labels input 120V AC, output 12V DC, and matching battery chemistry, with disconnected input and output leads.
For: Read the battery label
Illustrations show examples of the actions above. Follow your equipment’s instructions.
Notes about these pictures
Find whether it is a 12 V lead-acid, AGM, another lead-acid type, or an approved lithium type. “Lithium” alone is not enough to establish compatibility. The NOCO GENIUS1 example supports listed 6/12 V types and specified LiFePO4 modes; check the current manual and battery maker’s limits.
A young or first-time learner should practice with a capable adult or qualified instructor in a safe place. Your vehicle and tool manuals decide the exact procedure. Calling roadside assistance is a successful safe choice. Do not charge a damaged, leaking, swollen, or frozen battery. Never connect a household outlet directly to battery terminals. Do not use a car charger on an EV high-voltage battery.
Was this step clear?
Flag “Read the battery label” for review. We save the guide and step identifiers with your account to limit duplicates, not your private notes.
What to look for: See how this charger selects modes. Match battery chemistry and voltage using the current manuals; do not use force or repair modes as a beginner workaround.
Link details checked 2026-10-03. Video availability and equipment menus can change.
These YouTube videos belong to their respective creators. Life’s Checklists does not own them and is not affiliated with the creators. Links open on YouTube, where the videos are available independently of our membership.
How to use the video with this guide
Read “Before you begin” first. Watch the relevant part, pause, then return to the written step and its completion check. Use captions and playback speed if they help. A demonstration may cover only part of the task or show different equipment.
Your model’s instructions and current official guidance take priority. For urgent problems, follow the stop instructions without waiting to watch a video.
For this guide, the final result is: The charger is safely disconnected and the battery condition is checked.
A concrete way to approach this task
Compare the charger instructions with the exact battery type and vehicle guidance before choosing a mode.
What if I cannot complete a step?
If compatibility or the permitted connection method is uncertain, do not select a mode by trial and error. Confirm it first.
Identify the exact step: “Read the battery label.” Record what you tried, what happened, and which item or model you used. Ask for help with that specific problem rather than repeating an unsafe or unsuccessful action.
A young or first-time learner should practice with a capable adult or qualified instructor in a safe place. Your vehicle and tool manuals decide the exact procedure. Calling roadside assistance is a successful safe choice. Do not charge a damaged, leaking, swollen, or frozen battery. Never connect a household outlet directly to battery terminals. Do not use a car charger on an EV high-voltage battery.
Connect this skill to everyday life
Set a total purchase and running budget before shopping. Arrange an independent inspection and collect written terms for the specific vehicle.
A low monthly payment can come with a longer term or higher total cost. A vehicle history report is not a substitute for inspecting its current condition.