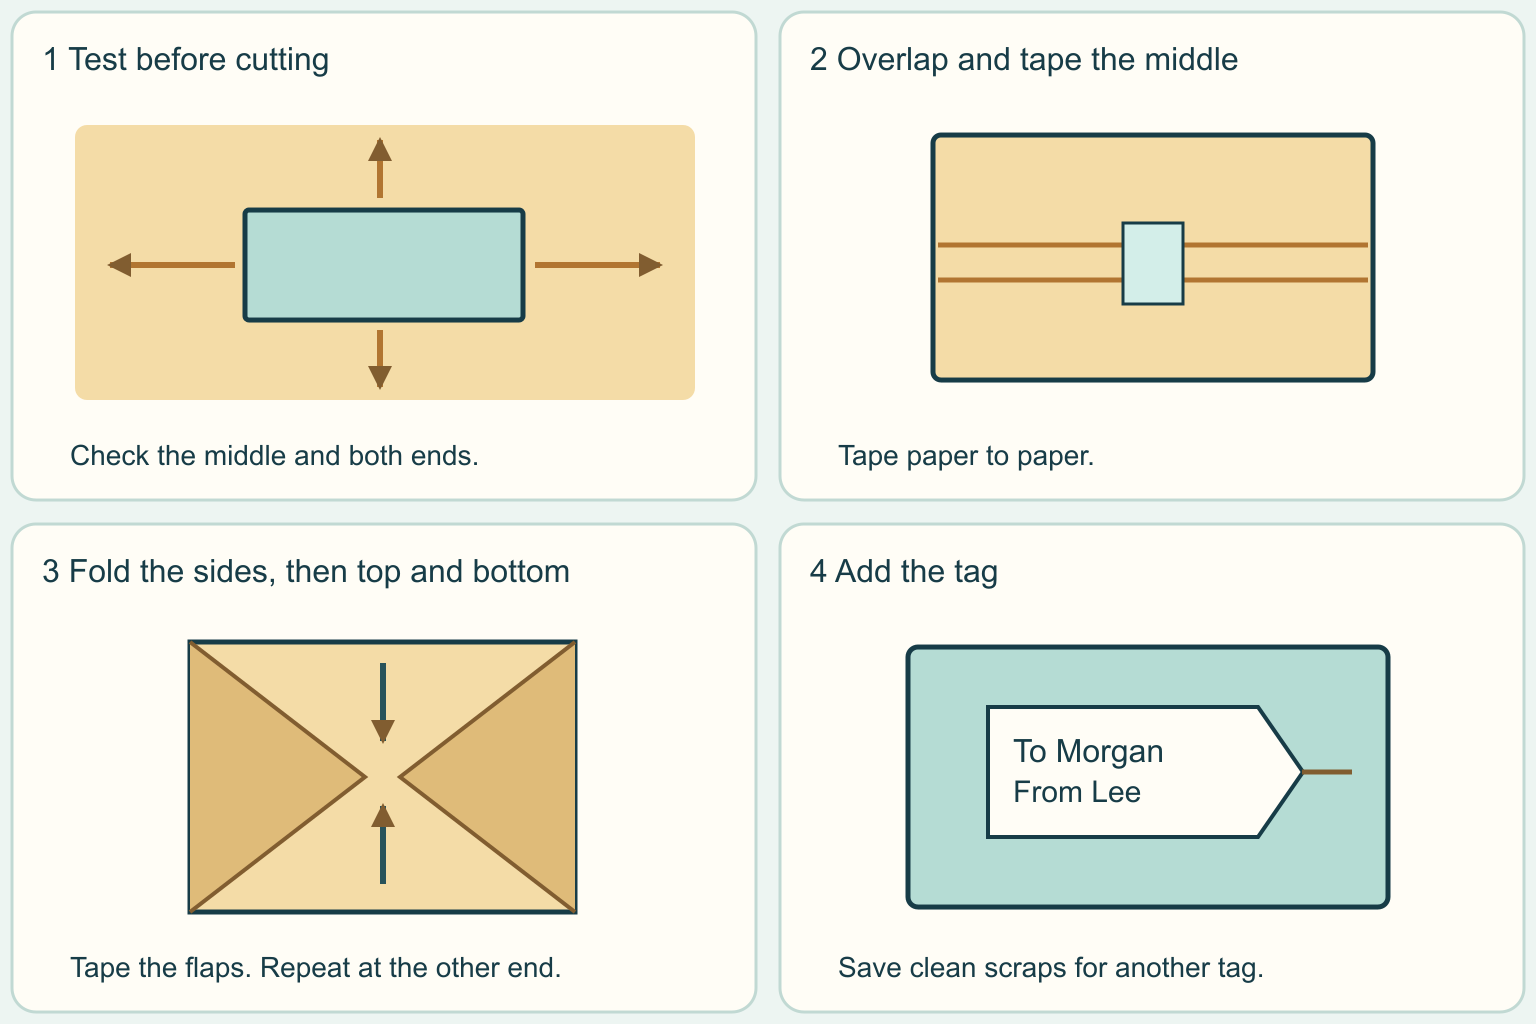
Try a simple wrap with a box, paper and tape. Test the fit before cutting.
Why it matters: A simple wrap keeps the gift a surprise and gives you a place to put the recipient’s name. You can practice with supplies you already have.
Written guidance reviewed: 2026-11-07 · Sources and equipment assumptions are below.
Take this guide to another device
Steps, notes, supplies, setup choices, results and check dates save on this browser as you work. Plus can also keep an account copy. Account copies update only when you choose Save; loading one replaces the browser draft shown here.
Review all saved work. Saved account check dates appear in My Day. Clear the date and save again to finish a follow-up. Email settings stay separate; existing opted-in agenda or deadline emails can include these dated actions.
Understand the job before starting
A simple wrap keeps the gift a surprise and gives you a place to put the recipient’s name. You can practice with supplies you already have.
A common mistake to avoid
If tape will not hold, check that the paper is dry and smooth. Use a clean piece of tape or try a reusable bag. For an odd shape, use a suitable box or bag instead of forcing this fold.
Use what you already have. Check each item when it is ready.
Before you begin
Use ordinary paper and a light box. Keep fingers out of the scissors’ path. Ask for help cutting, or use a gift bag if scissors or tight folds are hard to manage. Keep private addresses off shared tags and worksheets. This is gift wrap for handing to someone; it is not protective packaging for mailing.
0 of 4 steps checked0%
Guide progress and notes save on this browser; choose Save account copy above to carry them to another device with Plus. Downloads contain the complete blank checklist; print to include your current checks and notes.
Do it with me
Your step position saves on this browser. Use the picture when available, then check the written result.
STEP 1 OF 4
Choose a box and test the paper
Start here: Lay the box on the plain side of the paper.
Illustration: Choose a box and test the paper. Read the steps for your exact task.
Read-aloud is available in supported browsers; the written steps always remain available.
Use a closed box with flat sides.
A clean box you already own works for practice.
Lift the two paper edges that will meet around the middle.
One must cover part of the other; this is called overlap.
Check the two open ends too: the paper needs to reach far enough to cover each end when folded.
Test both ends before you cut.
If the sheet is short, turn the box a quarter turn and try again, or use a bigger sheet or reusable bag.
Before moving to the next step
Check this specific result: My paper reaches around the box and can cover both ends.
If that result is not true yet, leave the box unchecked. Write what is missing in your notes; use the official instructions below when the equipment or situation differs.
STEP 1 OF 4
Choose a box and test the paper
Start here: Lay the box on the plain side of the paper.
Illustration: Choose a box and test the paper. Read the steps for your exact task.
Use a closed box with flat sides.
A clean box you already own works for practice.
Lift the two paper edges that will meet around the middle.
One must cover part of the other; this is called overlap.
Check the two open ends too: the paper needs to reach far enough to cover each end when folded.
Test both ends before you cut.
If the sheet is short, turn the box a quarter turn and try again, or use a bigger sheet or reusable bag.
Before moving to the next step
Check this specific result: My paper reaches around the box and can cover both ends.
If that result is not true yet, leave the box unchecked. Write what is missing in your notes; use the official instructions below when the equipment or situation differs.
STEP 2 OF 4
Cut the sheet and tape the middle
Start here: Cut on a clear table, then bring the two long edges together.
Illustration: Cut the sheet and tape the middle. Read the steps for your exact task.
Mark the cut and move the box out of the scissors’ path.
Put the box back with its top face down so the seam, the line where the paper edges meet, ends up underneath.
Bring the first edge over, then lay the other edge over it.
Keep the paper snug without pulling hard.
Tape the outer edge to the paper beneath it.
A small loose spot is fine if the paper stays in place.
Before moving to the next step
Check this specific result: The middle is covered, and the tape holds the overlap.
If that result is not true yet, leave the box unchecked. Write what is missing in your notes; use the official instructions below when the equipment or situation differs.
STEP 3 OF 4
Fold and close one end at a time
Start here: Push the side flaps inward to form a top and bottom flap.
Illustration: Fold and close one end at a time. Read the steps for your exact task.
A flap is a loose piece of paper you can fold.
At one open end, press the left and right sides inward and flatten the diagonal folds with a finger.
Fold the top flap down against the box.
Fold the bottom flap up over it and tape it down.
Repeat at the other end.
If paper bunches, unfold and flatten it before trying again.
If a flap falls short, cover the gap with a scrap or switch to a bag.
Before moving to the next step
Check this specific result: Both ends are covered and the flaps stay closed.
If that result is not true yet, leave the box unchecked. Write what is missing in your notes; use the official instructions below when the equipment or situation differs.
STEP 4 OF 4
Add a tag and save usable supplies
Start here: Write who the gift is for, then check the wrap.
Illustration: Add a tag and save usable supplies. Read the steps for your exact task.
Turn the box right side up.
Gently check the middle and both ends for loose tape.
Write a short To and From tag, and attach it to the paper where it is easy to see.
Ribbon is optional.
Save clean scraps for tags and keep sturdy bags and boxes for another gift.
Shiny or laminated paper may not be accepted for recycling.
Check the local program’s rules instead of guessing from how the paper looks.
Before moving to the next step
Check this specific result: The right name is on the gift, and I saved what I can reuse.
If that result is not true yet, leave the box unchecked. Write what is missing in your notes; use the official instructions below when the equipment or situation differs.
Pictures for this guide
Picture 1 of 4 · Choose a box and test the paper
Paper extends beyond all four edges of a rectangular box for a fit check.
For: Choose a box and test the paper
Illustrations show examples of the actions above. Follow your equipment’s instructions.
Notes about these pictures
Use a closed box with flat sides. A clean box you already own works for practice. Lift the two paper edges that will meet around the middle. One must cover part of the other; this is called overlap. Check the two open ends too: the paper needs to reach far enough to cover each end when folded. Test both ends before you cut. If the sheet is short, turn the box a quarter turn and try again, or use a bigger sheet or reusable bag.
Use ordinary paper and a light box. Keep fingers out of the scissors’ path. Ask for help cutting, or use a gift bag if scissors or tight folds are hard to manage. Keep private addresses off shared tags and worksheets. This is gift wrap for handing to someone; it is not protective packaging for mailing.
Was this step clear?
Flag “Choose a box and test the paper” for review. We save the guide and step identifiers with your account to limit duplicates, not your private notes.
A specific companion has not been selected for this new guide yet. You can search for related demonstrations; search results have not been reviewed by Life’s Checklists.
These YouTube videos belong to their respective creators. Life’s Checklists does not own them and is not affiliated with the creators. Links open on YouTube, where the videos are available independently of our membership.
How to use the video with this guide
Read “Before you begin” first. Watch the relevant part, pause, then return to the written step and its completion check. Use captions and playback speed if they help. A demonstration may cover only part of the task or show different equipment.
Your model’s instructions and current official guidance take priority. For urgent problems, follow the stop instructions without waiting to watch a video.
Finish the job and know what to do next.
For this guide, the final result is: The right name is on the gift, and I saved what I can reuse.
A concrete way to approach this task
Fictional practice: Lee wraps a small empty tea box for Morgan. One scrap falls short at an end, so Lee tries a larger sheet before cutting. The finished tag reads To Morgan, From Lee. The first scrap becomes a spare tag.
What if I cannot complete a step?
If tape will not hold, check that the paper is dry and smooth. Use a clean piece of tape or try a reusable bag. For an odd shape, use a suitable box or bag instead of forcing this fold.
Identify the exact step: “Choose a box and test the paper.” Record what you tried, what happened, and which item or model you used. Ask for help with that specific problem rather than repeating an unsafe or unsuccessful action.
Use ordinary paper and a light box. Keep fingers out of the scissors’ path. Ask for help cutting, or use a gift bag if scissors or tight folds are hard to manage. Keep private addresses off shared tags and worksheets. This is gift wrap for handing to someone; it is not protective packaging for mailing.
Connect this skill to everyday life
Agree on the total spending limit and what matters most before committing to vendors. List guests and the costs affected by guest count.
A deposit is not the full price. A verbal promise may not match the written contract, and cancellation terms differ between vendors.